


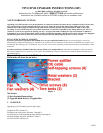

3 of 6
5. REMOVING THE EXISTING DRIVE
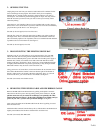
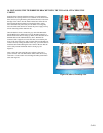
Once the hard drive and bracket are out of the TiVo, remove the IDE ribbon cable from the
motherboard by lifting straight up and out.
Now, using the larger (T-15) Torx tool, unscrew the four Torx drive screws that connect the hard
drive to the hard drive bracket. See Figure 6. You will not re-use these four screws or the metal
drive bracket, but you should save the screws and bracket, together with the ribbon cable you
removed.
Set aside (not reused): Four drive mounting screws; one IDE cable; one metal bracket
NOTE: Your factory drive might appear different than the one pictured in Figure 6.
Figure 6
6. SETTING THE JUMPER (ONLY APPLIES TO “ADD” KITS – “REPLACE” KIT INSTALLERS
CAN SKIP TO STEP 7)
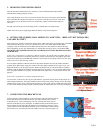
Pick up the factory hard drive and look at the hard drive with the label facing up and the empty power/IDE
cable connectors facing you. Your TiVo’s hard drive has one or two small white or black plastic
“jumper(s)” that are located between the IDE cable and the power cable connectors. Follow the steps
below (depending on your drive manufacturer) to confirm that your factory drive is set to Master. DO
NOT MAKE ANY JUMPER CHANGES TO ANY DRIVE(S) THAT YOU RECEIVED IN YOUR
UPGRADE KIT.
If your TiVo’s original drive is a Quantum or Maxtor hard drive: If your drive has one jumper, then you
will see a total of four pairs of pins (and, therefore, 4 possible vertical places for the jumper). Ignore the
single pin located closest to the IDE cable connector. If your drive has two jumpers, then your drive has a
total of 5 sets of two pins. See Figs 7 and 8.
In a one-jumper Quantum or Maxtor hard drive, the jumper should be moved to the furthest left-hand
position (again, ignoring the single pin). Gently remove the jumper with the end of a paper clip or your
fingernail and move it to the proper position. NOTE: the jumper must be vertical and must be carefully
inserted so that the jumper fits inside the left-hand most pins. See Figure 7. In a two-jumper Maxtor hard
drive, the jumper should be set properly, and should be in the shape of an "L" turned 90° clockwise. See
Figure 8.
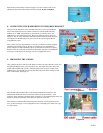
If your TiVo’s original drive is a Western Digital hard drive:
You will notice a total of five pairs of pins (and, therefore, 5 possible vertical places for the jumper). In a
Western Digital hard drive, the jumper should be moved to the center position. Gently remove the jumper
with the end of a paper clip or your fingernail and move it to the proper position. NOTE: the jumper must
be vertical and must be carefully inserted so that the jumper fits inside center pins vertically. See Figure 9.
Figure 7 (above)
Figure 8 (above)
Figure 9 (above)
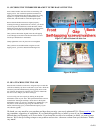
7. CONNECTING THE BRACKET FAN
Your kit includes a small bracket fan. Look at the edges of the fan and locate the two
airflow directional arrows printed in black on one side of the fan. Once you have
located the arrows, insert a self-tapping screw into each fan hole, in the opposite
direction of the airflow arrow. See Figure 10. (When installed on the bracket, the air
flow should be moving from under the bracket up toward the lid of the TiVo.) Once
you have the four screws through the fan holes, screw a small rubber washer onto the
end of each screw. You need only turn each washer one or two turns. See Figure 10.
Figure 10 (above)