


5 of 6
10. INSTALLING THE TWINBREEZE BRACKET INTO THE TIVO AND ATTACHING THE
CABLES
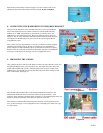
From the front of the unit, hold the bracket in your left hand near
the B/Slave drive (being careful not to touch the circuit board of the
drive) and use your right hand to guide the bracket tab (located near
the edge of the A drive) into the metal bracket base where the old
drive bracket had been mounted. You should be able to gently
lower the bracket into place with your left hand. You can gently
move the white cable near the fan toward the power supply to keep
it from obstructing airflow under the fan.
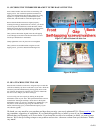
Once the bracket is down, connect the gray end of the IDE cable
into the B/Slave drive. Make sure to line up the IDE connector so
that the notch in the cable is facing up. Then, insert the black end of
the IDE cable into the A/Master/Factory drive. With the fan
connected, this is a tight fit. To insert the cable, start with the pins
closer to the front of the TiVo, then rock the cable into the IDE port
on the A drive. By rocking the cable in this way, you will be able to
install the cable without hitting the side of the fan. Be sure that the
cable is fully inserted and that the notch is facing up. See
Figure 15.
Next, connect the open end of the power splitter to the TiVo’s
power connector. You can then tuck the cables under the front lip
of the TiVo—but be careful not to dislodge the white panel ribbon
cable. See Figure 16.
Figure 15 (above) Front/top view
Figure 16 (above) Front/top view