


Operation
Vidikron Vision Model 10/Model 12 Owner’s Operating Manual 43
PRE
L
IMINAR
Y
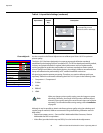
• Auto Tune: Auto Tune automatically adjusts settings to optimize computer images. Auto
Tune can be executed either on command or automatically whenever an incoming RGB
signal is present. To execute Auto Tune on command, select Execute Auto Tune and press
ENTER. To enable automatic Auto Tune, select Auto Tune and set it to ON.
Image Position: To adjust the horizontal and vertical position of the projected image, select
Image Position from the Image Option menu and press ENTER.
•H Position: Use the up- or down-arrow buttons ( , ) to select H Position. Then, use the
right-arrow button ( ) to shift the image to the right; use the left-arrow button ( ) to
shift the image to the left.
•V Position: Use the up- or down-arrow buttons ( , ) to select V Position. Then, use the
right-arrow button ( ) to shift the image up; use the left-arrow button ( ) to shift the
image down.
To restore the default image position, select Reset and press ENTER. Then, press ENTER to
confirm or EXIT to cancel.
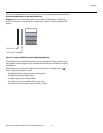
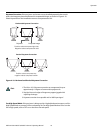
Over Scan Adjust: Overscan pushes the outside edge of the active picture area of the video
signal out beyond the edge of the display area.
Some television programs are produced based on the assumption that older television sets
may not display the outer edges of the broadcast picture area. Over scan effectively trims
away these inactive, outer edges and enlarges the remaining portion of the image to fill the
display area.
Select from 0% to 10% of Overscan, as desired.
For HDTV, DVDs and other video sources, Overscan is generally not necessary or desirable.
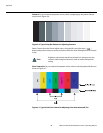
SDTV Adjust: To maximize the quality of 480i (composite, S-Video or component) video
signals, select SDTV Adjust from the Image Option menu and press ENTER.
• Chroma Enhance: Use Chroma Enhance to add chroma (color information) to the input
signal, making colors appear more vibrant and saturated.
• Video On Film: Set Video On Film to ON to repair distortions or abnormalities in a video
image.
•Film Mode: Use the Film Mode control to smooth out moving images from interlaced
sources. In most cases, the Vision 10/12 detects the proper “pull-down” rate and vertical
frequency. However, if your source is jittery and/or tearing you may wish to force a setting
to ensure stable processing for that source.
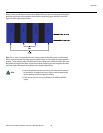
Brightness Enhance: to amplify the bright areas of the image, select Brightness Enhance
and use the right- or left-arrow button (
or ) to set it to ON. Brightness Enhance can be
useful for high ambient light environments or when you use the lower Lamp Power setting
(see below).
Lamp Power: Select Lamp Power from the Display Color Menu to adjust the lamp output
level. You can choose to run the lamp as bright as possible (250W; this is the default setting)
or you can choose the lower setting (200W). Generally, lower lamp output can prolong the
life of the lamp, but decreases brightness.
Auto Tune may take some time to complete, depending on the
characteristics of the incoming signal.
Note