


Operation
46 Vidikron Vision Model 10/Model 12 Owner’s Operating Manual
PRE
L
IMINAR
Y
ISF Settings Use the ISF Settings menu to perform advanced picture quality adjustments. This menu
should be used by ISF-certified technicians only.
Several controls in this menu are identical to those in the Picture Adjust menu, but are
accessible only by entering the ISF Calibration menu passcode. This makes it possible to
restore the picture quality settings to what they were when the projector was installed,
simply by recalling the “ISF Night” or “ISF Day” preset.
Brightness: Refer to Brightness on page 37.
Contrast: Refer to Contrast on page 38.
Color: Refer to Color Saturation on page 38.
Tint: Refer to Tint on page 39.
Sharpness: Refer to Sharpness on page 40.
Gamma: Refer to Gamma on page 40.
Color Temp: Refer to Color Temperature on page 41.
Load Saved Settings: To recall the Custom1, ISF Night or ISF Day settings, choose Load
Saved Settings from the ISF Calibration menu. Then, select “Custom1,” “ISF Night” or “ISF
Day” and press ENTER, or use the corresponding buttons on the remote control.
White Balance: Refer to White Balance on page 42.
Save Settings: For each input and supported resolution, the Vision 10/12 lets you save
image quality settings as presets that you can recall at a later time. You can create up to three
presets -- designated “Custom1,” “ISF Day” and “ISF Night” -- per input and resolution.
You should save changes to any of the following settings to a preset; otherwise they will be
lost when a new input source or resolution is selected:
• Aspect ratio
• Picture adjustments (brightness, contrast, color saturation, tint, sharpness, gamma, color
temperature, ICC selection and white balance settings)
• Image options (SDTV adjust settings, brightness enhance, lamp power)
To save image settings in the “ISF Day” or “ISF Night” preset, select Save Settings from the ISF
Calibration menu and select “ISF Day” or “ISF Night.” (To save settings to the “Custom1”
memory preset, refer to
Save Settings on page 42.)
Lamp Timer Reset: When you replace the projector lamp, you should also reset the lamp
hour counter. To do this, select Lamp Timer Reset from the ISF Calibration menu and press
ENTER. The Vision 10/12 shows the number of hours the projector lamp has been in service
and asks you to confirm or cancel the reset. Press ENTER to confirm or EXIT to cancel.
For detailed lamp replacement instructions, refer to Lamp Replacement on page 52.
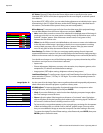
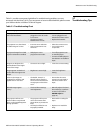
ISF Calibration
Brightness 0
Contrast 0
Color 0
Tint 0
Sharpness 3
Gamma 2.2
Color Temp 6500K
Load Saved Settings
White Balance
Save Settings
Lamp Timer Reset
ICC Adjust Standard
ISF Enable OFF
Blue Enable OFF
Splash Screen Timer 60 secs
Noise Reduction 4
➤
You must enter a passcode to access the ISF Settings menu.
Note