


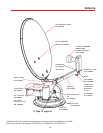

11
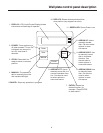
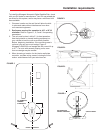
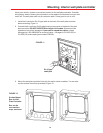
1. Position the roof template on the vehicle roof and drill 1/8” holes for the screws. DO NOT drill clear
through into interior of vehicle. The screws fasten mount to the roof only. Be sure the roof can
securely hold system.
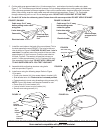
2. Place base plate gasket under the base before screwing unit down. Secure the base plate of the
motorized assembly to the roof using appropriate screws. DO NOT APPLY SEALANT AT THIS TIME.
Note: IF YOU ARE USING THE ROOF WEDGE (RW-5000), use the 3/16” gasket included with motor-
ized mount under the roof wedge. Install 1/16” gasket included with the RW-5000 roof wedge between
mount and roof wedge. Longer screws are needed for installation when using roof wedge.
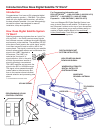
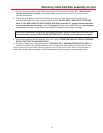
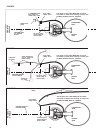
CAUTION!! Cable MUST BE ROUTED AS SHOWN IN FIGURE 6 and 6A to prevent cable wrap! If not
routed correctly, you may STRIP GEARS! BEFORE INSTALLATION, unroll cable to remove kinks.
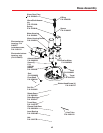
3. Route cable assembly around the base of the unit, Figure 6. FROM THE BACK OF THE ELECTRONICS
BOX TO THE FIRST CLAMP MUST BE 53”!
4. Drill hole for cable entry in appropriate place. THIS MUST BE 4” MINIMUM FROM FIRST CLAMP! You
can also run cable to an existing cable entry hole that meets the same distance requirements (4” mini-
mum), Figure 6A. Be sure cable is not too tight from mount to entry point when dish is in stow position. If
there is not enough slack in the cable, it will bind and prevent proper operation, or damage the mount.
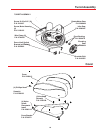
Mounting motorized dish assembly on roof