


1 2
3
54 6
7 8 9
WINEGARD COMPANY
Burlington, Iowa
connecting to
antenna
LG DTV SWM3
Ready: Multi-Sat
LG DTV SWM3
Home EL...
LG DTV SWM3
Searching...
LG DTV SWM3
*101 *99 *103
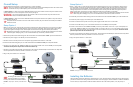
The receiver may run data feed and
guide feed tests for a few moments.
Then, you will be prompted to set up
the remote. Select “Setup Remote
Later” to do this at a later time.
Select “Watch DIRECTV.”
You are now ready to watch TV!
Once your setup is verified, you may
need to download a program guide.
If so, press “Continue” when the
status bar reaches 100%.
Select “Continue” to verify your setup.
Select “01: SWM” for the switch
type. Set the dish type for
“17: Slimline-3S (SWM).”
If required, press the DASH (-)
(underneath #7 on your remote).
Select “Satellite.” Select “Repeat Sat Setup.”Press “Menu” on your remote. Under
“Settings & Help,” select “Settings.”
DIRECTV HD Receiver Setup
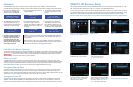
The following instructions assume that the TRAV’LER antenna has found and locked onto satellites 99°, 101°, and
103°. There should be an asterisk next to 99°, 101°, and 103° on the TRAV’LER interface.
In most receivers, the setup is done through the “Repeat Satellite Setup” option in your receiver menu. To access
the “Repeat Satellite Setup” option, go through the following steps. The following instructions are based on an H24
receiver. If your receiver differs from the options shown below, you may need to consult your receiver manual.
Check out online receiver setup guides for your antenna at www.winegard.com/receivers/setupguide.php.
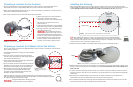
1. Press and hold “POWER” for two
seconds or until the TRAV’LER
interface displays “POWER ON.”
3. The interface screen will display
the type of satellite dish on the
top line.
2. Once the unit has been powered on,
release “POWER.”
6. In automatic search mode, the
TRAV’LER antenna will lock onto
three different satellites: 99°, 101°,
and 103°. The antenna will display
an asterisk for each satellite found.
5. The antenna will find its home
position and begin to look for a
satellite. Upon finding a satellite, the
antenna will fine-tune or “peak” on
the signal.
4. The TRAV’LER antenna will enter
the search mode as part of its
normal operation and will display
“Searching” on the bottom line.
TIP
If you want to turn off the power to the TRAV’LER antenna after the
antenna has locked onto satellites, press “POWER” and “SELECT” at
the same time.
Before traveling, make sure to press “POWER” and wait for the antenna to
start to power up; then press “POWER” again to initiate the stow sequence.
See below for information on stowing before traveling.
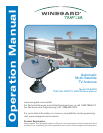
Operation
The TRAV’LER antenna offers a simple one-button operation. Simply press “POWER,” and the antenna will
automatically begin searching for satellites. The instructions assume that the antenna is already in the stowed position.
7. Continue to page 2 if setting up
the receiver for the first time or
if setting up the receiver after
moving the receiver from the
house to the RV. If the receiver is
already set up in the RV, you are
now ready to watch TV!
User Menu for Manual Operation
The interface includes a user menu for some advanced features. The options most commonly used are the ability to change
the dish type, check software/hardware versions, change desired satellite configuration, or manually move the dish.
WARNING
Improper use of the user menu could cause damage to the TRAV’LER antenna and/or vehicle. Do
not enter the user menu for regular operation.
Ready to Travel?
The TRAV’LER antenna is not meant for use while traveling. To stow the unit when you are ready to travel, press
“POWER” one time. The unit will stop what it is doing and return to the stowed position. The TRAV’LER interface will
not turn off unless the TRAV’LER anetnna is successfully stowed. Visually inspect that the antenna is in the stowed/
travel position before traveling. Do not move the vehicle until the TRAV’LER antenna is stowed.
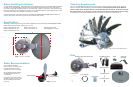
Emergency Manual Stow
If unable to stow the TRAV’LER antenna, it may be necessary to use emergency manual stow. Emergency manual
stow is meant as a last resort and is not meant for common usage! To use emergency manual stow, unplug the
interface box. Then, remove the black plastic bolt from the back of the mount. Insert a 3/8th socket extension into this
auxiliary drive. Turn the auxiliary drive clockwise to lower the unit. Do not use a drill!
Emergency Power Off
The antenna comes with an emergency power off feature. To activate it, press and hold “POWER” and then press
“SELECT” while still holding “POWER”. The TRAV’LER antenna will stop and turn off. If the emergency power off
feature is used, the antenna may not be in a safe position for travel. Do not move the vehicle until the unit is stowed.
2
1