


E-19
English
settings
menus
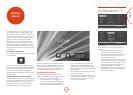
e Settings menus allow you to congure all aspects
of your BDP300. e next few pages will go through
the menu items and explain their function. e Settings
menus may look daunting if you are new to setting up
home cinema, but the majority of them need only be
congured once when you rst install the system.
e only way to view the Settings menus is on your
display device (TV or projector) using the on-screen
display (OSD) capability of the BDP300. To view the
OSD for the initial setting up, connect any of the video
outputs to your display device (or AV receiver connected
to your display).
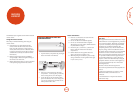
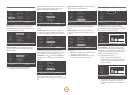
Entering the settings menu
e SETTINGS icon is shown on screen when the BDP300
is rst switched on.
If the main menu is not currently displayed, press
u
on the remote control to display it. Note that during the
playback of music, video or JPEG les, further button
presses may be required to exit the folder structure.
With the SETTINGS icon highlighted, press
O
to enter
the Settings menu.
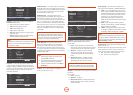
Unstable OSD menu or picture display?
e default BDP300 output video resolution when rst
powered up out of the box has been chosen according to
the national standard in the country of purchase.
If the output resolution and frame rate is at a setting
your display device does not support, the picture
may become unstable or may not display at all. If this
happens, connect the BDP300 directly to your display
using the composite video connection in order to see
the menus. Once the correct video settings have been
entered, a higher-quality connection can be used.
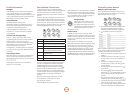
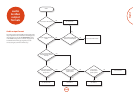
Navigating the menus
e BDP300 menus can be navigated by using the
cursor (up, down, le, right) keys on the remote control.
1. To display the main menu, press
u
.
2. Use the
B
and
C
keys to navigate up and
down the main headings in the le-hand panel.
3. With the main section you require highlighted,
use the
E
key to enter the middle column.
4. Use the
B
and
C
keys to navigate up and
down the options in the middle column. Some
options may be greyed out because they are not
currently selectable (e.g. network IP address when
DHCP is used).
5. Pressing
E
selects a setting: use the
B
and
C
keys to change the setting.
6. Press
O
to conrm the setting. Go back to step 4
to adjust any other settings in the current section.
7. Press
<
to return to the previous screen if you
want to select another section.
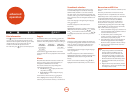
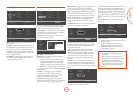
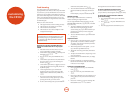
Display
With the SETTINGS icon highlighted on your display,
press
O
to show the ‘Display’ options.
Use cursor keys to highlight menu and
OK key to select
4
TV Aspect Ratio
Resolution
TV System
HDMI Color Space
HDMI Deep Color
HDMI 1080p 24Hz
16:9 Normal
1080p
PAL
Auto
Auto
Off
Display
Audio
Language
Network
System
Security
RTN SETUP
Exit
Press
E
to move to the options in the second column.
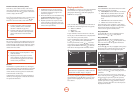
Use cursor keys to highlight menu and
OK key to select
16:9 Normal
16:9 Full
4:3 Pan&Scan
4:3 Letterbox
4
3
Display
Audio
Language
Network
System
Security
RTN SETUP
Exit
TV Aspect Ratio
Resolution
TV System
HDMI Color Space
HDMI Deep Color
HDMI 1080p 24Hz
6
TV Aspect Ratio – Set the aspect ratio (shape) of your
display. Press
E
to move to the options in the third
column.
< 16:9 Normal: Use with widescreen TVs. 4:3
material is zoomed to t the wide screen.
< 16:9 Full: Use with widescreen TVs. 4:3 material
is displayed in its original aspect ratio, with
vertical black bars at the sides.
< 4:3 Pan and Scan: Use with 4:3 non-widescreen
TVs. 16:9 widescreen content is displayed with the
le- and right-hand sides of the image cropped to
t the screen (no black bars). e aspect ratio is
maintained (the image is not stretched).
< 4:3 Letterbox: Use with 4:3 non-widescreen TVs.
16:9 widescreen content is displayed with black
bars at the top and bottom.