


1400 Series Granulators Chapter 5: Maintenance 23 of 43
5-3 Replacing and Adjusting the Knives
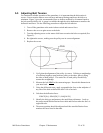
During use, the clearance between the rotor knives and the bed knives will increase due to
wear. This is a normal condition that requires re-setting this clearance once or twice before it
is necessary to remove the knives for regrinding. Check the knives weekly for wear,
clearance, exposure, and screw tightness.
When new knives are fitted to the machine, adjustment after eight hours of running time may
be required.
Before assembling a new or reground set of knives, make sure the knife seats and mounting
holes are clean. Do not use grease or oil on screws or tapped holes when assembling the
knives.
Knives must be replaced in complete sets; otherwise it will not be possible to obtain even
clearance between the rotor knives and bed knives.
Before applying a wrench to any knife bolt, be certain that the rotor is blocked
to prevent rotation. One such method is to use a block of wood at least 1 1/2”
thick between a knife and a fixed portion of the frame.
Rotor Knives
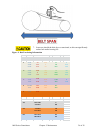
We recommend that the rotor knife screws be replaced with new screws every sixth knife
change to reduce the risk of screw failure due to overstretching. Screws must be replaced
with the type specified in the spare parts list. Use the following procedure to replace or adjust
the rotor knives:
Rotor knives should be changed one seat at a time to prevent rotor from being
rotated in an out-of-balance condition.
1. Access the cutting chamber as directed in Section 3-4 on page 18.
2. Loosen check nuts on bed knife adjusting screws and back off screws.
3. Remove bed knife shields.
4. Disengage bed knife pull screws.
5. Remove the bed knife bolts and bed knives.
6. Remove rotor knife bolts and knives on one seat. This should be done from the
downstroke side of the cutting chamber.
7. Thoroughly clean knife seat.
8. Install new knife on seat and tighten knife bolts. See Section 7-1 on page 32 for
torque recommendations.
Bolt threads should not be oiled. Wipe thread with an oil-dampened cloth.
9. Repeat steps 6 through 8 for each rotor knife.