


10
INSTALLATION OF THE PAV2000DTV SYSTEM
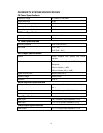
Installation Kit(s) Contents
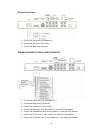
1. Main Control Unit Accessory Kit (P/N 170-0004)
1x DIN Sleeve (P/N 108-3812)
1x Fuse/Filter Harness (P/N 112-3425)
1x Power/Speaker Harness (P/N 112-3426)
1x Remote Control (P/N 136-3712)
1x Video Cables (P/N 112-3427)
1x Antenna Extension Cable (P/N 118-1132)
1x Data Control Harness (P/N 112-3428)
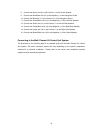
2. Mounting / Bracket Hardware Kit (P/N 150-1562)
2x Mounting Bracket (P/N 108-3814)
4x #8-32x1/4" Phil.Screw, Cap Point (P/N 100-1473)
4x Flat Washer, #10 (P/N 100-2160)
4x Lock Washer, #10 (P/N 100-2161)
4x Washer, #8 Flat Washer (P/N 100-1880)
4x #8-Lock Washer (P/N 100-2308)
3. Installation Hardware Kit (P/N 150-1563)
1x Strap, Rear Mounting, Perforated (P/N 108A3698)
2x Flat Washer, #10 (P/N 100-2160)
2x Lock Washer, #10 (P/N 100-2161)
1x M5x8MM Hex Hd. Machine Screw (P/N 100-1602)
Owner's and Installation Guide (P/N 128-7148)
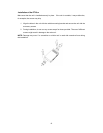
Headunit Installation
Choose the mounting location carefully so that the unit will not interfere with the normal driving
function of the driver. Avoid installing the unit where it would be subject to high temperatures
such as from direct sunlight or hot air from the heater or where it would be subject to dust, dirt
or excessive vibration. Use only the supplied mounting hardware for a safe and secure
installation.
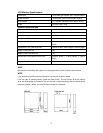
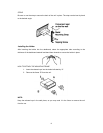
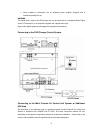
Mounting Angle Adjustment
Adjust the mounting angle to less than 20 degrees.
MOUNTING EXAMPLE
Installation in the dashboard