


Before using the player, connect the player to a TV and/or
amplifier.
Before making connections
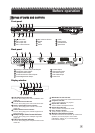
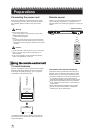
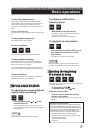
Connecting to a conventional TV
Connecting to a TV with an S-Video jack
If your TV has a S-VIDEO input, you can get better picture
quality by connecting it with the S-VIDEO output of the
player using an S-video cable instead of connecting the
composite video input of the TV to the composite video
output of the player.
Do not connect the AC power cord until all other
connections have been made.
Connect VIDEO OUT of the player directly to the video
input of your TV. Connecting VIDEO OUT of the player
to a TV via a VCR may cause a monitor problem. You
may also have a monitor problem when connecting the
player to an integrated TV/Video system.
When using the S-VIDEO output jack, do not connect the
COMPONENT VIDEO OUT jacks on the player.
NOTES
NOTE
In the following description, "TV" may be substituted
with "monitor" of "projector".
Terminal names used for other components may be
different from those used in the following description.
The following sections to describe TV connections
where only a TV is connected to the player so that you will
hear sound also from the TV.
Connect the Composite video output of the player to the
video input of TV. Connect the 2 Channel Downmix Audio
outputs to the audio inputs of TV.
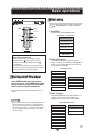
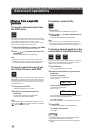
Connecting to a TV with component jacks
NOTES
Connect "Y" to "Y", "PB" to "PB" (CB), "PR" to "PR" (CR)
correctly.
When using the COMPONENT video output, do not connect
the S-VIDEO output of the player.
If your TV has COMPONENT video inputs, you can enjoy
picture of high-fidelity color reproduction by connecting it
with COMPONENT video outputs of the player..
In the Progressive scanning mode, you can enjoy high
quality picture with less flickers. The Progressive
scanning mode works only when you connect the player
and TV using COMPONENT video. See “Selecting
preferences” at page 17 for more details.
Progressive scan video playback available
There are some progressive TV and High-Definition TV sets
that are not fully compatible with the player, resulting in the
unnatural picture when playing back a DVD VIDEO disc in
the Progressive scanning mode. In such a case, use the
Interlaced scanning mode.
NOTES
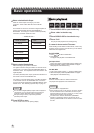
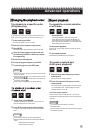
Connecting to a stereo audio
amplifier / receiver
Connect the player's 2 Channel Downmix audio outputs (ML,
MR) to any line-level inputs (such as AUX, DVD, CD, etc.) of
an audio amplifier or receiver.
Connecting to a digital audio device
You can enjoy sound of enhanced quality by connecting the
player's DIGITAL (either OPTICAL or COAXIAL) audio
outputs to a digital audio input of an amplifier or receiver,
using an optical or coaxial digital cable. The digital audio
signal including the Dolby Digital or DTS signal on a disc will
be transferred directly from the player.
Connecting to Analog 5.1 Channel Dolby
amplifier / receiver
Connect the player's Analog 5.1 Channel Dolby audio outputs
(FL, FR, SUB, SL, SR, CEN) to an amplifier or receiver with
5.1 Channel Analog audio inputs.
Connect the player and the digital audio device by using
either an optical digital cable or a coaxial digital cable.
It is not recommended to use the digital jacks for dubbing.
When recording the sounds(DVD VIDEO, Video CD or Audio
CD) played back on the player, record them through the
analog (2 Channels or 5.1 Channels) outputs.
Depending on the disc, no signal may come out from the
DIGITAL outputs. Make an analog connection in this case.
Set SPDIF OUTPUT in the AUDIO SETUP correctly
according to the connected digital audio
equipment. If setting made for SPDIF OUTPUT is
incorrect, loud noise may be generated causing
damage to the speakers.
NOTE
5
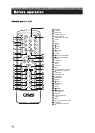
Preparations
ConnectionsConnections
Connecting to a TV
Connecting to optional audio
equipment
A
B
C
A
C