


Setup
MVP™ (12/18/37.5) Series Getting Started User Manual, Rev. 10 -7-
3. Setup
AC Power
Each MVP™ has an auto-ranging power supply that works
with an input voltage range of
100~240 VAC, 50/60 Hz.
Make sure that you are connecting the MVPs to the proper voltage, as specified
in this
User Manual and on the product’s specification sticker.
Always connect this product to a protected circuit with an appropriate electrical
ground to avoid the risk of electrocution or fire.
To determine the power requirements for each MVP™ in the s
eries, refer to the label
affixed to the product. You can also refer to the Technical Specifications chart in this
manual.
The listed current rating indicates the maximum current draw during normal operation. For
more information, you may download Sizing Circuit Breakers from the CHAUVET
®
website: www.chauvetpro.com.
Never connect this product to a rheostat (variable resistor) or dimmer circuit, even if
the rheostat or dimmer channel serves only as a 0% to 100% switch.
AC Plug
Each MVP™ comes with a power linking cord to connect power between panels; however
,
the power input cord is not included.
The power input cord must
be purchased separately. CHAUVET® recommends the
Neutrik® powerCON® extension cable, item number PCEXT50FT,
available from
CHAUVET®.
This cable has a powerCON connector to connect to the MVP™ and a bare plug for
power
input. Use the table below as a reference to wire a new plug.
Connection Wire (US) Wire (Europe) Screw Color
AC Live Black Brown Yellow or Brass
AC Neutral White Blue Silver
AC Ground Green/Yellow Green/Yellow Green
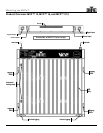
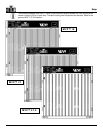
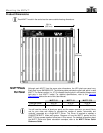
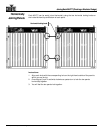
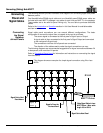
Power Linking
All three panels in the Series support power linking.
Refer to the following table for
specifications on each panel.
MVP™ 12 MVP™ 18 MVP™ 37.5
@ 120 V, 60 Hz 7 7 13
@ 208 V, 60 Hz 11 11 20
@ 230 V, 50 Hz 12 12 22
Please refer to all applicable local codes and regulations for the proper installation
of this product.