


Page 13SKU 66508 For technical questions, please call 1-800-444-3353
INSPECTION, MAINTENANCE, AND CLEANING
WARNING! Make sure the Power Switch of the Drain Cleaner is in its “OFF”
position and that the tool is unplugged from its electrical outlet before performing any
inspection, maintenance, or cleaning procedures.
General
Before each use,1. inspect the general condition of the Drain Cleaner. Check for loose
screws, misalignment or binding of moving parts, cracked or broken parts, damaged
electrical wiring, and any other condition that may affect its safe operation. If abnormal
noise or vibration occurs, have the problem corrected before further use. Do not use
damaged equipment.
Periodically recheck all nuts, bolts, and screws for tightness.2.
After each use, clean the Drain Cleaner components with a wet, clean cloth. Wipe dry 3.
when clean.
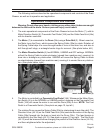
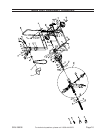
Always keep Cable (39a) well oiled by pouring oil directly into the Drum (38a). Then 4.
push the Motor Direction Switch (5) to the NORMAL position. The Drum will rotate. Do
this until the entire Cable is lubricated. Lubricate all other moving parts adequately to
protect against corrosion, sand, grit, and other abrasive material.
Store unit in a clean and dry location. Cover unit with a cloth cover.5.
The cable includes a Cable Stop (80) to prevent it from being overextended. Loosen 6.
the Bolts (81), and remove Stop if removing the cable. When re-installing Cable, reat-
tach the Stop inside the drum when there are about two full turns of cable still in the
drum.
Auto Feed Maintenance
Keep the auto feed mechanism free of excessive soil and grit. It is recommended that
it be ushed with fresh water, followed by a light oiling of the moving parts. No disassembly
is normally required. Failure to feed during operation can usually be traced to the build up of
soil and grit. Over time, dirt can harden enough to stop roller rotation. Flushing with water,
followed by liberal oiling can usually restore function. If disassembly is required, proceed
as follows:
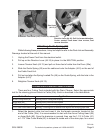
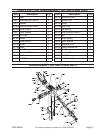
Remove the two bolts that hold the Front Cap (44-19A) and internal roller to the Case 1.
(44-11A).
Slide the front Cap out of the Case and inspect and clean the roller as described 2.
above.
Remove the four bolts that hold the End Cap (44-7A) and Guide Rollers (44-9) to the 3.
Case (44-11A).
Slide the End Cap out of the Case and inspect and clean the three guide rollers as 4.
described above.