


13
X. Instrument Panel
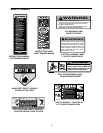
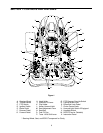
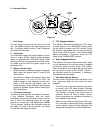
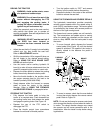
Figure 12
1. Fuel Gauge
The fuel gauge monitors the fuel level in the fuel
tank. The needle pointing to the right indicates a full
tank. The ignition switch must be in the ON position
to activate the fuel gauge.
2. Tachometer
The tachometer shows the engine speed in revolu-
tions per minute (RPM). Optimal engine operating
speed is approximately 3400-3600 RPM. When
operating PTO driven attachments the RPM indica-
tor needle must be within the green range on the
tachometer dial.
3. Battery Indicator Light
• Bulb illuminates and battery voltage is displayed
briefly when the ignition switch it turned to the
"ON" position.
• Illuminates to indicate the battery voltage has
dropped below 11.5 (+0.5/-1.0) DC volts. The
battery voltage is also displayed on the hour
meter. If this indicator and display come on
during operation, check the battery and charging
system for possible causes and/or contact your
Cub Cadet dealer.
4. Oil Pressure Indicator
This warning lamp indicates low engine oil pressure.
If this indicator illuminates, stop the tractor
immediately and check the engine oil level. If the oil
level is within the operating range, but the light
remains on, contact your Cub Cadet dealer. NOTE:
The oil pressure indicator may illuminate when the
key switch is turned to the on position, but should
turn off when the engine is started.
5. PTO Engaged Indicator
This indicator illuminates whenever the PTO switch
is pulled upward in the "ENGAGED" position while
the key switch is turned to the "ON" position. Check
this indicator if the engine will not crank with the key
switch in the "START" position—the indicator should
not be illuminated. If necessary, move the PTO
switch to the "DISENGAGED" position.
6. Brake Engaged Indicator
This indicator illuminates whenever the brake pedal
is fully depressed or the parking brake is engaged
and the key switch is turned to the "ON" position.
Check this indicator if the engine will not crank when
the key switch is turned to the "START" position—
the indicator should be illuminated. If necessary,
fully depress the brake pedal.
7. Hour Meter/Battery Display
The hour meter records the hours and tenths of an
hour (right most digit) that the tractor has been
operated.
• The hour meter is activated when the key switch
is turned to the “ON” switch position. Because
the key switch may be accidentally left in the
"ON" position, a record of the actual hours of
operation should be kept to assure mainte-
nance procedures are completed according to
the schedule in this manual.
• When the key switch is turned to the "ON" posi-
tion, the battery indicator light briefly illuminates
and the battery voltage is briefly displayed. The
display then changes to the accumulated hours.
RPM
x1000
04
FUEL
EF
HOURS 1/10
1
2
4
5
6
3
Green
Range
7