


14
SECTION 2: OPERATION
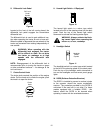
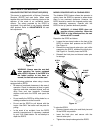
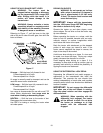
ROLLOVER PROTECTIVE STRUCTURE (ROPS)
This tractor is equipped with a Rollover Protection
Structure (ROPS) and seat belts. When used
together they are effective in reducing injuries to the
operator in the event of an accidental tractor
rollover. The safety provided by the ROPS is
minimized if the seat belt is not properly adjusted
AND buckled. Refer to ADJUSTMENTS for seat
belt adjustment.
Figure 13
WARNING: Always wear the seat belt
when operating the tractor equipped
with a ROPS. However, if the ROPS is in
the folded position or has been re-
moved, the seat belt must not be used.
Use the following guidelines when using a tractor
equipped with a ROPS:
• Be aware of overhead clearances in the area of
operation. Check for clearance of door (or gate)
openings and other overhead objects such as
utility lines and tree branches. Overhead
objects could catch the ROPS and upset the
tractor.
• Do not modify the ROPS by drilling holes for, or
welding accessories to the structure.
• Do not use the ROPS to pull objects with the
tractor. Use ONLY the tractor rear tow plate for
pulling.
• In the event of an accident, have the ROPS
carefully inspected and, if necessary, replaced
by your Cub Cadet dealer. Do not attempt to
repair the ROPS.
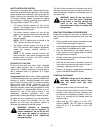
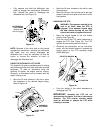
MODELS EQUIPPED WITH A FOLDING ROPS
The foldable ROPS feature allows the operator to
quickly lower the ROPS to operate in areas where
there is low overhead clearance. However, the
ROPS should be used in the lowered position only
when absolutely necessary. Operate with the
ROPS in the ‘up’ position whenever possible.
WARNING: A folded ROPS does not
provide rollover protection. When the
ROPS is in the folded position, the seat
belt must NOT be used.
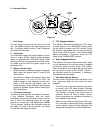
Reposition the ROPS as follows:
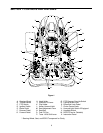
• Loosen the two clamp knobs on the front of the
ROPS to relieve their pressure on the ROPS.
See Figure 14.
• Remove the two internal cotter pins, and, while
supporting the ROPS, withdraw the hitch pins.
See Figure 14. Carefully lower the ROPS.
• Reinstall the hitch pins and internal cotter pins
for storage.
Figure 14
To raise the ROPS:
• Remove internal cotter pins and hitch pins and
lift the ROPS into position.
• Insert the hitch pins and secure with the
internal cotter pins.
• Tighten the clamp knobs against the ROPS.
ROPS
SEAT
BELT
INTERNAL
COTTER PIN
CLAMP
KNOB
HITCH
PIN
HITCH
PIN