


19
ENGLISH
5
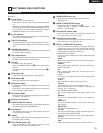
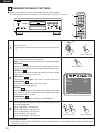
PART NAMES AND FUNCTIONS
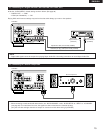
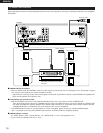
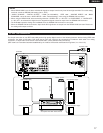
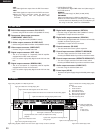
(1) Front Panel
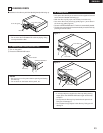
See page 3.
q
Power button
• Press once to turn the power on.
• Press again to set to the “OFF” position and turn the power
off.
• Set the power to the standby mode by pressing the POWER
OFF button on the remote control unit while the power is on.
• Turn the power on from the standby mode by pressing the
POWER ON button on the remote control unit.
w
Power indicator
• This indicator lights when the power is on and when the
power is in the standby mode.
e
AL24 PLUS indicator
• This indicator lights when the audio signals of a DVD, etc.,
are being processed digitally with the AL24 processing
Plus.
r
DENON LINK indicator
• This indicator lights when the audio signals are transferred
by DENON LINK connections.
t
IEEE 1394 indicator
• This indicator lights when the audio signals are transferred
by IEEE 1394 connections. (See page 37.)
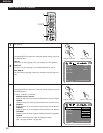
y
Disc tray
• Load discs here. (See page 23.)
• Press the OPEN/CLOSE button
!6 to open and close the
disc tray.
• The disc tray is also closed when the PLAY button
u is
pressed.
u
PLAY button (1)
• Press this button to play the disc. (See page 42.)
i
STOP button (2)
• Press this to stop the disc. (See page 44.)
o
Skip button (8)
• Press this to move back to the beginning of the current track
(or chapter).
• Press again to move back to the beginning of the previous
track (or chapter). (See page 45.)
!0
Skip button (9)
• Press this to move ahead to the beginning of the next track
(or chapter). (See page 45.)
!1
Remote control sensor
!2
SUPER AUDIO CD indicator
• This indicator lights when playing areas of Super audio CDs
recorded in DSD format (STEREO/MULTI).
!3
DVI indicator
• This indicator lights when the video signals output from
the DVI-D output connector.
!4
Display
• Information on the disc that is currently playing is shown on
the display. (See page 20.)
!5
STILL/PAUSE button (3)
• Press this button to pause images or music or to play
images frame by frame. (See pages 44, 45.)
!6
OPEN/CLOSE button (5)
• Press this button to open and close the disc tray.
(See page 23.)
!7
MODE of MODE SETUP button
• Press this to set the MODE SETUP (@0).
(Super Audio CD / FILTER / PURE DIRECT / DVI
SETUP / DVI BK LEVEL)
!8
Slow/Search button (6)
• Press this to set the slow play mode and to search in the
reverse direction. (See pages 44, 45.)
!9
Slow/Search button (7)
• Press this to set the slow play mode and to search in the
forward direction. (See pages 44, 45.)
@0
SELECT of MODE SETUP selector
• Use this to switch the area/layer of the Super audio CDs
played with priority, and turn the circuitry other than the
analog audio signal circuitry on and off and to set the video
signal output from the DVI connector, etc.
• SUPER AUDIO CD SETUP
Use this to set the area/layer of the Super audio CDs played
with priority.
MULTI:
When playing Super audio CDs, the Multi-channel area is
played with priority.
STEREO:
When playing Super audio CDs, the stereo area area is
played with priority.
CD:
When playing Super audio CDs, the CDs layer area is
played with priority.
• FILTER:
This sets the low pass filter value when playing Super
Audio CDs.
50 kHZ:
High frequencies of 50 kHz and higher are cut.
100 kHZ:
High frequencies of 100 kHz and higher are cut.
Set to 100 kHz when a high frequency compatible AV
amplifier, etc., is connected.
• PURE DIRECT (AUDIO) MODE:
The circuits not being used (output signals) can be turned
off.
NORMAL:
This turns the PURE DIRECT mode off. All signals are
output.
VIDEO OFF:
This turns the video output off. Use this when only using
audio signals.
DIGITAL OFF:
This turns the digital output off.
ALL OFF:
This turns the digital output, display and video output off.
• DVI (VIDEO output) SETUP MODE:
Use this to set the DVI-D connector’s video signal output.
DVI OFF:
No signal from the DVI-D connector.
480P:
480P video signals are output from the DVI-D connector.