


Mounting the Antenna
3-8 Antenna Installation
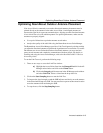
Mounting the Directional Antenna
You can mount the RoamAbout 14 dBi directional antenna on a mast or a flat vertical
surface such as a wall. In most cases, mounting the antenna on a mast allows more
flexibility in adjusting the height and direction of the antenna in order to better aim it at the
opposite end of the wireless link.
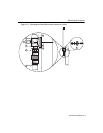
The RoamAbout 14 dBi directional antenna kit includes the following hardware:
• A metal backing plate
• Two U-bolts and two clamps
• Four flatwashers and four nuts
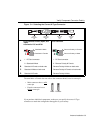
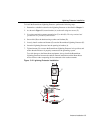
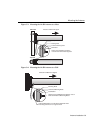
Figure 3-3 illustrates how to mount the RoamAbout 14 dBi directional antenna on a mast.
Install the antenna with the arrows on the plastic antenna mounting base pointing up. If
using a tripod mount, the antenna mast must be secured to the roof using 3 or 4 guy wires
that are equally spaced around the mast. When the height of the antenna mast is more than
3 meters (10 feet), you are advised to use at least three guy wires for each 3 meter (10 foot)
section of the mast.
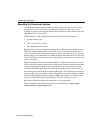
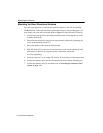
Figure 3-4 illustrates how to mount the RoamAbout 14 dBi directional antenna on a flat
surface. Install the antenna with the arrows on the plastic antenna mounting base pointing
up. When mounting the antenna on a flat vertical surface, you must provide a smooth
surface for the backing plate. On wall surfaces such as brick, block or stucco, install an
intermediate plate between the wall and the backing plate. The intermediate plate must be
strong enough to prevent distortion of the backing plate and the plastic antenna mounting
base when the mounting hardware is tightened. Make sure that the roof overhang is not
excessive and that the location is high enough to provide a clear line of sight.
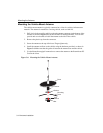
Both figures illustrate mounting the antenna for vertical polarization.
When completed, connect the antenna cables as described in the “Connecting the
Antenna Cables” section on page 3-13.