


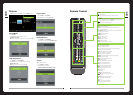

Lock
Press MENU button on the remote and ◄/► use to cycle to LOCK page:
Note: All options are initially greyed out until password is entered (see below)
Lock System:
Set TV system time settings
» Select Lock System
» Enter factory default password (0000)
Set Password:
» From the LOCK menu select SET PASSWORD
» Change password from factory default (above):
Block Program:
» From the LOCK menu select Block Program.
» Select channels to block and require password to watch.
Parental Guidance:
» From the LOCK menu select Parent Guidance.
» Select age restriction
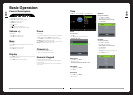
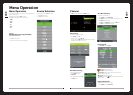
Media Play Function (DMP)
Access media les (Photo’s, Music, Movie’s and Text) via the TV’s USB port.
Press MEDIA button on the remote.
Picture:
Supported picture formats include .jpg/jpeg and .gif
The image should be no bigger than 3000 x 3000 pixels.
» Select Photo source
» Use ◄ or ► to select disk and press ENTER to view photo list
» Select the desired Photo/s
» Press PLAY to view
» Press EXIT to remove OSD
Music:
Supported music formats include .mp3
» Select Music source
» Use ◄ or ► to select disk and press ENTER to view music list
» Select the desired music track/s
» Press PLAY to begin playback
» Press EXIT to remove OSD
Movie:
Supported movie formats include .mpg, .vob, .avi, and .mp4
The maximum matrix is below MPEG2 MA/ML.
» Select Movie source
» Use ◄ or ► to select disk and press ENTER to view movie list
» Select the desired movie.
» Press PLAY to begin playback
» Press EXIT to remove OSD
Text:
Supported text format is .txt
» Select Text source
» Use ◄ or ► to select disk and press ENTER to view text list
» Select the desired text.
» Press PLAY to view text le
» Press EXIT to remove OSD
011
Thank you very much for your purchase of this product. Please read this manual carefully and keep it safe for reference.
Please use the power cord designated for the product. When an extension cord is required, use one with the correct power rating. The cord must be grounded. The product should be
installed on a at surface to avoid tipping. Space should be maintained between the back of the product and the wall for proper ventilation. If you would like to mount the TV to the wall,
please see “Preparing the LCD for Wall Mounting” below for additional information. Avoid installing the product in the kitchen, bathroom or other places with high humidity.
Important Notes
RESET: Like any product controlled by microprocessors this TV may hang or become
unresponsive, in the unlikely event this occurs simple disconnect the power and reconnect
after 10 seconds.
REMOTE: To prevent leakage which may result in bodily harm or damage to the remote:
1. Install AAA batteries correctly, and make sure polarities are correctly aligned with the
battery compartment markings.
2. Do not mix batteries (OLD and NEW or CARBON and ALKALINE ,etc)
3. Remove batteries when the remote is not used for a long time.
My music, movie or image les do not display?
Due to the large variation of le sizes, compression formats and codec available, playback
of all les cannot be guaranteed.
I cannot record onto my USB ash drive?
FAT 32 formatted ash drive is required.
Time Shift functionality does work work?
FAT 32 formatted ash drive is required.
Warning! Do not keep images on the screen for a long time
To prevent the screen from burn in, do not leave static images including menu screens
displayed for a period of time. Burn in is not covered under warranty provision.
ATTENTION: Do not try to update the TV unless directed by a service technician.
Product miscongured by an incorrect update is not covered under warranty.
Installation
Preparing Your LCD TV For Wall Mounting
The HDTV can either be kept on the stand or mounted to the wall for viewing. If you choose
to mount the HDTV to the wall, please follow the instructions below .
» Unplug all the cables and cords from your LCD TV.
» Place the LCD TV face down on a soft and at surface (blanket, foam, cloth, etc) to
prevent any damage to the display.
» Remove the stand screws allowing the stand to be removed.
» The mounting bracket is made up of two parts - the wall bracket and the TV
bracket. Attach the TV bracket to the TV via the included screws.
» Using the supplied mounting template, mark the location for the mounting bracket.
» Attach the wall bracket to the wall with appropriate screws. Ensure the wall is
suitable to hold the weight of the TV.
» Slide the TV bracket into the wall bracket.
002
PUBLISHED BY FUSION ELECTRONICS LIMITED. © Copyright 2010 by FUSION Electronics Limited. All rights reserved. Specications and design are subject to change without notice.
YOU CAN HELP PROTECT THE ENVIRONMENT Please remember to respect the local regulations: Hand in the non-working electrical equipment to an appropriate waste disposal centre. v3.2
Installing the LCD TV Base Assembly
If you choose to mount the HDTV on the supplied base, please follow the instructions
below .
» Unplug all the cables and cords from your LCD TV.
» Place the LCD TV face down on a soft and at surface (blanket, foam, cloth, etc) to
prevent any damage to the display.
» Connect the base support to the metal axle from the rear using 2 of the supplied
4x10 screws.
» Secure the base support using the nal 4x10 screw through the bottom of the
base support.
» Ax the base to the base support and secure with 2 of the supplied 3x8 screws.