


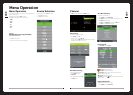

Options
Press MENU button on the remote and ◄/► use to cycle to OPTION page below:
OSD Language:
Set current menu language
» Select OSD Language
Audio Language:
Set audio language
» Select Audio Language
» Press ◄ or ► to cycle through available languages:
Subtitle Language:
Set subtitle language
» Select Subtitle Language
» Press ◄ or ► to cycle through available languages:
Hearing Impaired:
» Select Hearing Impaired
» Select ON or OFF
PVR File System:
(Reference ‘PVR File System’ on following page)
OSD Time Out:
» Select OSD Time Out
» Select from OFF, or from 10S - 90S
Blue Screen:
» Select Blue Screen
» Select ON or OFF for whether a Blue Screen is displayed when there is no signal input.
(Except MEDIA and DVD)
Restore Factory Default:
» Select Restore Factory Default to restore to initial settings
Sound
Press MENU button on the remote and ◄/► use to cycle to SOUND page below:
Sound Mode:
» Select Sound Mode
» Press ◄ or ► to cycle through available sound modes:
Standard, Music, Movie, Sports and User.
Note: Treble and Bass can only be changed under User.
Adjust Balance:
» From the SOUND menu select Balance
Auto Volume:
» From the SOUND menu select Auto Volume.
» Select ON or OFF
SPDIF Mode:
» From the SOUND menu select SPDIF MODE.
» Press ▲ or ▼ to cycle through available modes for SPDIF:
PCM, Auto, or O.
010
003
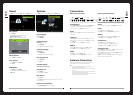
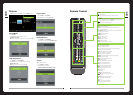
Connections
Y
IN
VIDEO L R USB 2
HDMI 2
IN
RF
IN
IN
Y PB PR
Bottom Connection Panel:Side Connection Panel:
12V DC
IN USB 1
HDMI 1
IN VGA AUDIO VIDEO
OUTIN
L R
EAR
PHONE
OUT OUT
COAXIAL
Power:
Connect the AC power pack or 5M DC y lead to the 12V DC IN connection on the TV.
USB 1:
Insert the USB ash drive into the USB slot on the TV.
Select the USB input source using the MEDIA or INPUT button on the remote.
HDMI 1:
Connect the HDMI output of the accessory device to the HDMI input on the TV.
Select the HDMI input source using the INPUT button on the remote.
VGA/Audio In:
Connect the RGB output of the PC to the VGA input on the TV.
Connect the PC audio output of the PC to the Audio input jack on the TV
Select the VGA input source using the INPUT button on the remote.
Video/Audio Out:
Connect the AUDIO output from the television to the AUX input of the device using the
supplied A/V cable (White and Red [left and right audio]).
Connect the VIDEO output from the television to the Composite VIDEO input of the device
using the supplied A/V cable (Yellow [video]).
NOTE: Video out functionality is only available through the DTV, ATV and AV sources.
Video out will not work on HDMI, MEDIA, or Y Pb Pr.
Antenna Connection
To ensure good picture and sound, a Terrestrial TV antenna system needs to be
installed. For best reception, an outdoor antenna is recommended.
NOTE:
• Do not put the Coaxial cable close to the mains lead to avoid noise.
• Do not place the Coaxial cable under the TV.
• Additional equipment, cables and adapter plugs shown are not supplied with
this TV set.
• To obtain optimum quality picture and sound, an Aerial, the correct cable (75 Ω
coaxial) and the correct terminating plug are required.
• Your local dealer may be able to assist you in obtaining the correct Aerial system
for your particular area and the accessories required.
Video/Audio In:
Connect the VIDEO and AUDIO output jack of the DVD or VCR to the VIDEO/L/R IN jacks
using an AV cable (Yellow [Video], White and Red [left and right audio]).
Select the AV input source using the INPUT button on the remote.
RF IN:
Connect the antenna to the RF IN connection. Please refer to the Antenna Connection
paragraph below.
Y/Pb/Pr In:
Connect the Y Pb Pr output of the accessory device to the Y Pb Pr input on the TV.
Connect the Audio output of the accessory device to the L/R IN input jacks on the TV
using the RCA cable.
Select the Y Pb Pr input source using the INPUT button on the remote.
HDMI 2:
Connect the HDMI output of the accessory device to the HDMI input on the TV.
Select the HDMI input source using the INPUT button on the remote.
USB 2:
Insert the USB ash drive into the USB slot on the TV.
Select the USB input source using the MEDIA or INPUT button on the remote.