


PROGRAMMING THE REMOTE 9
PROGRAMMING THE REMOTE
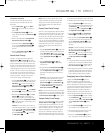
Erasing Macro Commands
To remove the commands that have been pro-
grammed into one of the Macro buttons
, follow
these steps:
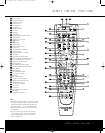
1. Press the
Mute Button and the Macro
Button
that contains the commands you
wish to erase
.
2.The
Program/SPL Indicator c will flash
amber, and the LED under the
AVR Selector f
will turn red.
3.
Within ten seconds, press the
Surround Mode
Selector/Channel Do
wn Button
k.
4.
The red LED under the
A
VR Selector
f will
go out, and the
Program/SPL Indicator c
will turn green and flash three times before it
goes out.
5.When the
Program/SPL Indicator c goes
out, the Macro has been erased.
Volume Punch-Through
The RCP 2 may be programmed to operate the
Volume Control and Mute functions of
either the TV or the AVR in conjunction with any of the
devices controlled by the remote. For example, since
the AVR will likely be used as the sound system for TV
viewing, you may wish to have the AVR’s volume acti-
vated, although the remote is set to run the TV. Either
the AVR or TV volume control may be associated with
any of the RCP 2’s devices.The factory default is to
have the AVR’s volume controls active for all devices
except CD and TAPE.To program the remote for
Volume Punch-Through, follow these steps:
1. Press the
Input Selector e for the unit you wish
to have associated with the volume control and the
Mute
Button
at the same time until the red
light appears under the
Input Selector e; the
Program/SPL Indicator c will flash amber.
2. Press the
Volume Up Button ; the Program/
SPL Indicator c will stop flashing and stay amber.
3.
Press either the
A
VR Selector
f or the Input
Selector
e, depending on which system’s
volume control you wish to have attached for the
punch-through mode.The
Program/SPL Indicator
c will blink green three times and then go out to
confirm the data entry.
Example: T
o have the
A
VR’
s volume control acti
-
vated even though the RCP 2 is set to control the
TV, first press the
VID 3/TV Input Selector e
and the Mute
Button
at the same time
.
Next,
press the
Volume Up Button , followed by
the
AVR Selector f.
NOTE: Should you wish to return the RCP 2 to the
original configuration after entering a Volume Punch-
Through,
you will need to repeat the steps shown
above. However, press the same Input Selector in
Steps 1 and 3.
Channel Control Punch-Through
The RCP 2 may be programmed to operate so that the
channel control function for either the
TV, cable or satel-
lite receiver used in your system may be used in con
-
junction with one of the other devices controlled by the
remote. For example,while using and controlling the
VCR, you may wish to change channels on a cable box
or satellite receiver without having to change the device
selected by the AVR or the RCP 2.To program the
remote for Channel Control Punch-Through, follow
these steps:
1. Press the
Input Selector Button e for the device
you wish to have the channel control associated with
and the
Mute Button at the same time until
the red light appears under the
Input Selector e
and the Program/SPL Indicator c flashes
amber.
2. Press the
Volume Down Button .The
Program/SPL Indicator c will stop flashing
and stay amber.
3. Press and release the
Input Selector Button e
for the device that will be used to change the chan-
nels.The
Program/SPL Indicator c will blink
green three times and then go out to confirm the
data entry.
Example: To control the channels using your cable
box or satellite receiver while the RCP 2 is set to
control the VCR, first press the
VID 1/VCR Input
Selector Button
e and the Mute Button
at the same time. Next,release them and press
the
Volume Down Button , followed by the
VID 3/TV Input Selector Button e.
NOTE: To remove the Channel Control Punch-Through
and retur
n the RCP
2 to its original configuration,
repeat
the steps shown in the example above. However, press
the
VID 1/VCR Input Selector e in Steps 1 and 3.
Transport Control Punch-Through
The RCP 2 may be programmed to operate so that the
T
ransport Control Functions
`
(Play
,
Stop
,
F
ast
Forward, Rewind, Pause and Record) for a VCR,DVD
or CD will operate in conjunction with one of the other
devices controlled by the RCP 2.
For example,while
using and controlling the TV, you may wish to start or
stop your
VCR or DVD without having to change the
device selected by the AVR or the RCP 2.The factory
default is to have the DVD’s transport controls active for
all devices except CD and TAPE.To program the remote
for Transport Control Punch-Through, follow these steps:
1. Press the
Input Selector e for the device you
wish to have the channel control associated with and
the
Mute Button at the same time until the
red light appears under the
Input Selector e and
the
Program/SPL Indicator c flashes amber.
2.
Press the
Play Button `.
The
Program/SPL
Indica
tor
c will stop flashing and stay amber
.
3. Press and release the
Input Selector Button e
for the device that will be used to change the chan
-
nels.The
Program/SPL Indicator c will blink
green three times and then go out to confirm the
data entry.
Example: To control the transport of the DVD while
the RCP 2 is set to control the TV, first press the
VID 3/TV Input Selector Button e and the
Mute Button at the same time. Next, release
them and press the
Play
Button
`,
followed by
the
DVD Input Selector Button e.
NOTES:
• To remove the Channel Control Punch-Through and
return the RCP 2 to its original configuration, repeat
the steps in the example above. However, press the
VID 3/TV Input Selector e in Steps 1 and 3.
• Before programming the RCP 2 for Volume,Channel
or Transport Punch-Through, make certain that any
programming needed for the specific TV, CD,DVD,
cable or satellite receivers has been completed.
Reassigning Device Control Selectors
Although each Input Selector e is nor
mally
assigned to the category of product shown on the
RCP 2, it is possible to reassign one of these buttons to
operate a second device of another type. For example,
if you have two
VCRs but no satellite receiver
,
you may
program the
“SAT” button to operate a second VCR.
Before following the normal programming steps for
either Three-Digit entry or Auto Search code entry,you
must first reassign the button with the following steps:
1.
Press the
Input Selector e you wish to reassign
and the
Mute Button at the same time until
the red light appears under the
Input Selector e
and the Program/SPL Indicator c flashes
amber
.
2.
Press the
Input Selector e for the device you
wish to program into the reassigned button.
3. Enter the three-digit code for the specific model
you wish the reassigned button to operate
.
4. Press the same
Input Selector e pressed in
Step 1 once again to store the selection.The red
33
34
35
36
37
38
39
40
41
48
49
46
47
44
45
42
43
38
39
40
41
31
32
30
28
29
25
26
27
28
29
30
24
23
22
21
20
31
37
36
35
34
33
32
31
37
36
35
34
33
32
48
49
50
51
47
46
45
44
43
42
33
34
35
36
37
38
39
40
41
48
49
46
47
44
45
42
43
38
39
40
41
31
32
30
28
29
25
26
27
28
29
30
24
23
22
21
20
31
37
36
35
34
33
32
31
37
36
35
34
33
32
48
49
50
51
47
46
45
44
43
42
33
34
35
36
37
38
39
40
41
48
49
46
47
44
45
42
43
38
39
40
41
31
32
30
28
29
25
26
27
28
29
30
24
23
22
21
20
31
37
36
35
34
33
32
31
37
36
35
34
33
32
48
49
50
51
47
46
45
44
43
42
33
34
35
36
37
38
39
40
41
48
49
46
47
44
45
42
43
38
39
40
41
31
32
30
28
29
25
26
27
28
29
30
24
23
22
21
20
31
37
36
35
34
33
32
31
37
36
35
34
33
32
48
49
50
51
47
46
45
44
43
42
33
34
35
36
37
38
39
40
41
48
49
46
47
44
45
42
43
38
39
40
41
31
32
30
28
29
25
26
27
28
29
30
24
23
22
21
20
31
37
36
35
34
33
32
31
37
36
35
34
33
32
48
49
50
51
47
46
45
44
43
42
33
34
35
36
37
38
39
40
41
48
49
46
47
44
45
42
43
38
39
40
41
31
32
30
28
29
25
26
27
28
29
30
24
23
22
21
20
31
37
36
35
34
33
32
31
37
36
35
34
33
32
48
49
50
51
47
46
45
44
43
42
33
34
35
36
37
38
39
40
41
48
49
46
47
44
45
42
43
38
39
40
41
31
32
30
28
29
25
26
27
28
29
30
24
23
22
21
20
31
37
36
35
34
33
32
31
37
36
35
34
33
32
48
49
50
51
47
46
45
44
43
42
33
34
35
36
37
38
39
40
41
48
49
46
47
44
45
42
43
38
39
40
41
31
32
30
28
29
25
26
27
28
29
30
24
23
22
21
20
31
37
36
35
34
33
32
31
37
36
35
34
33
32
48
49
50
51
47
46
45
44
43
42
33
34
35
36
37
38
39
40
41
48
49
46
47
44
45
42
43
38
39
40
41
31
32
30
28
29
25
26
27
28
29
30
24
23
22
21
20
31
37
36
35
34
33
32
31
37
36
35
34
33
32
48
49
50
51
47
46
45
44
43
42
33
34
35
36
37
38
39
40
41
48
49
46
47
44
45
42
43
38
39
40
41
31
32
30
28
29
25
26
27
28
29
30
24
23
22
21
20
31
37
36
35
34
33
32
31
37
36
35
34
33
32
48
49
50
51
47
46
45
44
43
42
33
34
35
36
37
38
39
40
41
48
49
46
47
44
45
42
43
38
39
40
41
31
32
30
28
29
25
26
27
28
29
30
24
23
22
21
20
31
37
36
35
34
33
32
31
37
36
35
34
33
32
48
49
50
51
47
46
45
44
43
42
33
34
35
36
37
38
39
40
41
48
49
46
47
44
45
42
43
38
39
40
41
31
32
30
28
29
25
26
27
28
29
30
24
23
22
21
20
31
37
36
35
34
33
32
31
37
36
35
34
33
32
48
49
50
51
47
46
45
44
43
42
33
34
35
36
37
38
39
40
41
48
49
46
47
44
45
42
43
38
39
40
41
31
32
30
28
29
25
26
27
28
29
30
24
23
22
21
20
31
37
36
35
34
33
32
31
37
36
35
34
33
32
48
49
50
51
47
46
45
44
43
42
33
34
35
36
37
38
39
40
41
48
49
46
47
44
45
42
43
38
39
40
41
31
32
30
28
29
25
26
27
28
29
30
24
23
22
21
20
31
37
36
35
34
33
32
31
37
36
35
34
33
32
48
49
50
51
47
46
45
44
43
42
33
34
35
36
37
38
39
40
41
48
49
46
47
44
45
42
43
38
39
40
41
31
32
30
28
29
25
26
27
28
29
30
24
23
22
21
20
31
37
36
35
34
33
32
31
37
36
35
34
33
32
48
49
50
51
47
46
45
44
43
42
RCP 2 Remote OM 10/4/04 4:38 PM Page 11