


47
Recording
Basic Recording from a TV
Follow the instructions below to record a TV program.
Recording starts immediately and continues until the
disc is full or you stop the recording.
Note:
When recording on DVD:
You must load a recordable disc for DVD recording.
1. Press the HDD or DVD button to select media.
Also make sure that the TV input is set to this
recorder.
If you load a completely blank disc, the recorder
takes a short while to initialize the disc.
2. Set a recording mode as necessary by pressing
REC MODE repeatedly. (XP, SP, LP, EP)
3. Use v / V buttons to select the TV channel to
record.
You can also use the HOME button for the above
operation.
4. Press z (REC) once.
Recording will start. (The REC indicator lights in
the display window.)
• Recording continues until you press x (STOP)
or the disc or HDD is full.
•To record for a fixed length of time, see Instant
Timer Recording on right.
5. Press x (STOP) to stop recording.
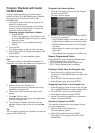
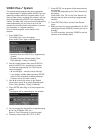
Changing TV Audio Channel
You can select the audio channel (language) to listen
by pressing AUDIO during viewing TV program. The
current audio channel is displayed on-screen.
Stereo or mono broadcast:
Stereo → Left → Right → Mono
Bilingual broadcast:
Main → Sub → Main+Sub
•For TV recording with bilingual, set audio channel
from the [TV Rec Audio] in sub-menu of the Setup
menu (see page 26).
• If the sound is of poor quality when set to Stereo,
you can often improve it by changing to Mono (Left
or Right).
• This recorder can record either NICAM or regular
audio. If the NICAM setting (page 20) is set to Auto,
then if the broadcast is NICAM, the audio automati-
cally changes to NICAM and you can record the
NICAM audio. If the broadcast is non-NICAM, the
regular audio is always recorded.
If NICAM sound distortion occurs, due to poor
reception, you can switch off NICAM setting of the
program.
To Pause the Recording
1. Press X (PAUSE/STEP) to pause recording.
2. When you want to continue recording, press
X (PAUSE/STEP).
To record one TV program while watch-
ing another
1. Press TV/DVD to select the TV mode during
recording. The TV indicator appears.
2. Using the TV, select the channel to be viewed.
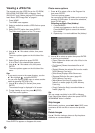
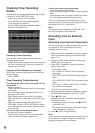
Instant Timer Recording
Instant Timer Recording allows you to make a record-
ing easily of a preset length without using the program
timer.
1. Follow steps 1-4 as shown left (Basic Recording
from a TV).
2. Press z (REC) repeatedly to select the recording
time length.
Recording starts after the first press. Each subse-
quent press increases the recording time within
free space (maximum 240 minutes).
The recording time is displayed on the TV screen.
At the end of the recording, the recorder will stop
recording and shut off.
Checking the Recording Time
Press z (REC) once to check the recording time. The
recalled setting will automatically return to the TV
screen for a moment.
Also, remaining time of recording is shown in the dis-
play window.
To Extend the Recording Time
The recording time can be extended anytime by
pressing z (REC).
Each subsequent press increases the recording time
within free space (maximum 240 minutes).
Caution
If the recorder is unplugged (or there is a power fail-
ure) while the recorder is recording, the program
being recorded will be lost from the beginning.