


Advanced Operations (Stereo System)
47
press the AVX button to select L1 as the output channel of the cable box (see page 47).
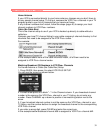
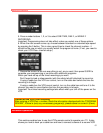
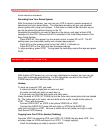
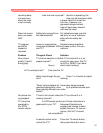
C. Advanced Hookup (Cable box to unscramble only pay channels)
1. Connect as shown.
This connection requires additional accessories not provided.
2. Plug in power cords of VCR, TV, and cable box.
You will tune the TV to its video input to watch the VCR. All pay channels are viewed
through the VCR.
Illustration of Hookup
Advanced Operations (Stereo System)
Integrating Your Stereo System
There are several reasons to consider hooking up your stereo system with your TV and
VCR.
If your TV does not have stereo, you can get stereo quality from your VCR by hooking
it to your stereo receiver.
Even if your TV does have stereo, you can get better sound by taking advantage of
your stereo's better speakers.
You can record stereo audio on your VCR for longer play times, or use the VCR as an
extra tape deck for dubbing.
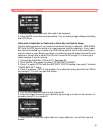
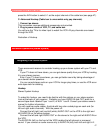
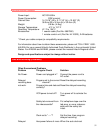
Hookup
Stereo System Hookup
To make this hookup, you need to be familiar with the options on your stereo system.
Look at the back of your receiver. Probably you have AUDIO IN and OUT jacks for a
second tape deck--labeled Tape 1 and 2, or AUX 1 and 2. Consult your stereo owner's
manual for further information.
You will need two audio cables--the kind with two color-coded plugs on each end (for
left and right audio channels). With the power off:
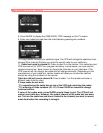
Connect the left right (red) and left (white) AUDIO OUT on the VCR to the right and
left AUDIO IN on the stereo system.
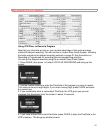
Connect the left and right AUDIO OUT on the stereo to the right and left AUDIO IN on
the VCR.
The AUDIO IN (left) on the front of the VCR handles the left-channel or monaural
sound. If you connect an audio source only to AUDIO IN (left), both left and right hi-fi