


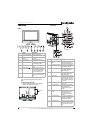
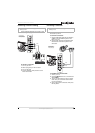

13
Insignia NS-19LCD 19” LCD TV
www.insignia-products.com
4 Press the VOL+ or VOL– button one or more
time to adjust the option.
If you are in TV or Video mode, you can
adjust the following options:
• Brightness–Adjusts the screen
brightness.
• Contrast–Adjusts the screen contrast.
• Color–Adjusts the color saturation.
• Tint–Adjusts the image tint.
• Sharpness–Adjusts the sharpness.
If you are in D-Sub mode, you can adjust the
following options:
• Brightness–Adjusts the screen
brightness.
• Contrast–Adjusts the screen contrast.
• Color–Adjusts the color saturation.
For information about other options you can
change in D-Sub mode, see “Adjusting the
image in D-Sub mode” on page 13.
5 Press the MENU button.
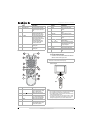
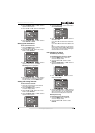
Adjusting the image in D-Sub mode
If you are using the D-Sub mode, you can adjust
the:
• Picture (automatically)
• Clock and phase
• Image position
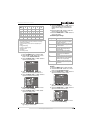
Adjusting the picture automatically
To adjust the picture automatically:
1 Press the MENU button to open the OSD.
2 Press the CH+ or CH– button one or more
times to select Image.
3 Press the ENTER, VOL+, or VOL– button to
open the Image menu. The Auto
Adjustment option is highlighted.
4 Press the ENTER, VOL+, or VOL– button to
open the Auto Adjustment menu. The Auto
Adjustment/Yes option is highlighted.
5 Press the ENTER, VOL+, or VOL– button to
start the auto adjustment.
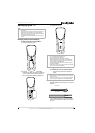
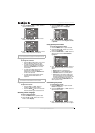
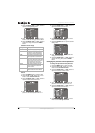
Adjusting the clock and phase
Adjust the clock frequency if the display image
shimmers or has rainbow-like noise.
Adjust the phase setting if the display image is
blurry.
To adjust the clock and phase:
1 Press the MENU button to open the OSD.
2 Press the CH+ or CH– button one or more
times to select Image.
3 Press the ENTER, VOL+, or VOL– button to
open the Image menu.
4 Press the CH+ or CH– button one or more
times to select Clock or Phase.
5 Press the VOL+ or VOL– button to adjust the
option.
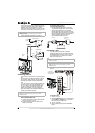
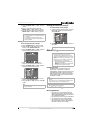
Adjusting the image position
To adjust the image position (alignment):
1 Press the MENU button to open the OSD.
2 Press the CH+ or CH– button one or more
times to select Image.
3 Press the ENTER, VOL+, or VOL– button to
open the Image menu.
4 Press the CH+ or CH– button one or more
times to select Image Position.
5 Press the ENTER, VOL+, or VOL– button to
open the Image Position menu.
6 Press the CH+, CH–, VOL+, or VOL– button
to adjust the image position.
Adjusting the sound
Setting the stereo mode
To set the stereo mode:
1 Press the MENU button to open the OSD.
2 Press the CH+ or CH– button one or more
times to select Sound.