2
Insignia NS-R20C Round Tube TV
www.insignia-products.com
10 Protect the power cord from being walked on
or pinched particularly at plugs, convenience
receptacles, and the point where they exit
from the apparatus.
11 Only use attachments or accessories
specified by the manufacturer.
12 Use only with a cart, stand,
tripod, bracket, or table
specified by the manufacturer.
13 Unplug this apparatus during
lightning storms or when
unused for long periods of time.
14 Refer all servicing to qualified service
personnel.
Servicing is required when the apparatus has
been damaged in any way, such as the
power-supply cord or plug is damaged, liquid
has been spilled or objects have fallen into
the apparatus, the apparatus has been
exposed to rain or moisture, does not operate
normally, or has been dropped.
15 If an outside antenna or cable system is
connected to your TV, make sure that the
antenna or cable system is grounded to
provide some protection against voltage
surges and built-up static charges. Article
810 of the National Electrical Code,
ANSI/NFPA No. 70, provides information with
respect to correct grounding of the mast and
supporting structure, grounding of the lead-in
wire to an antenna discharge unit, size of
grounding conductors, location of the
antenna-discharge unit, connection to
grounding electrodes, and requirements for
the grounding electrode.
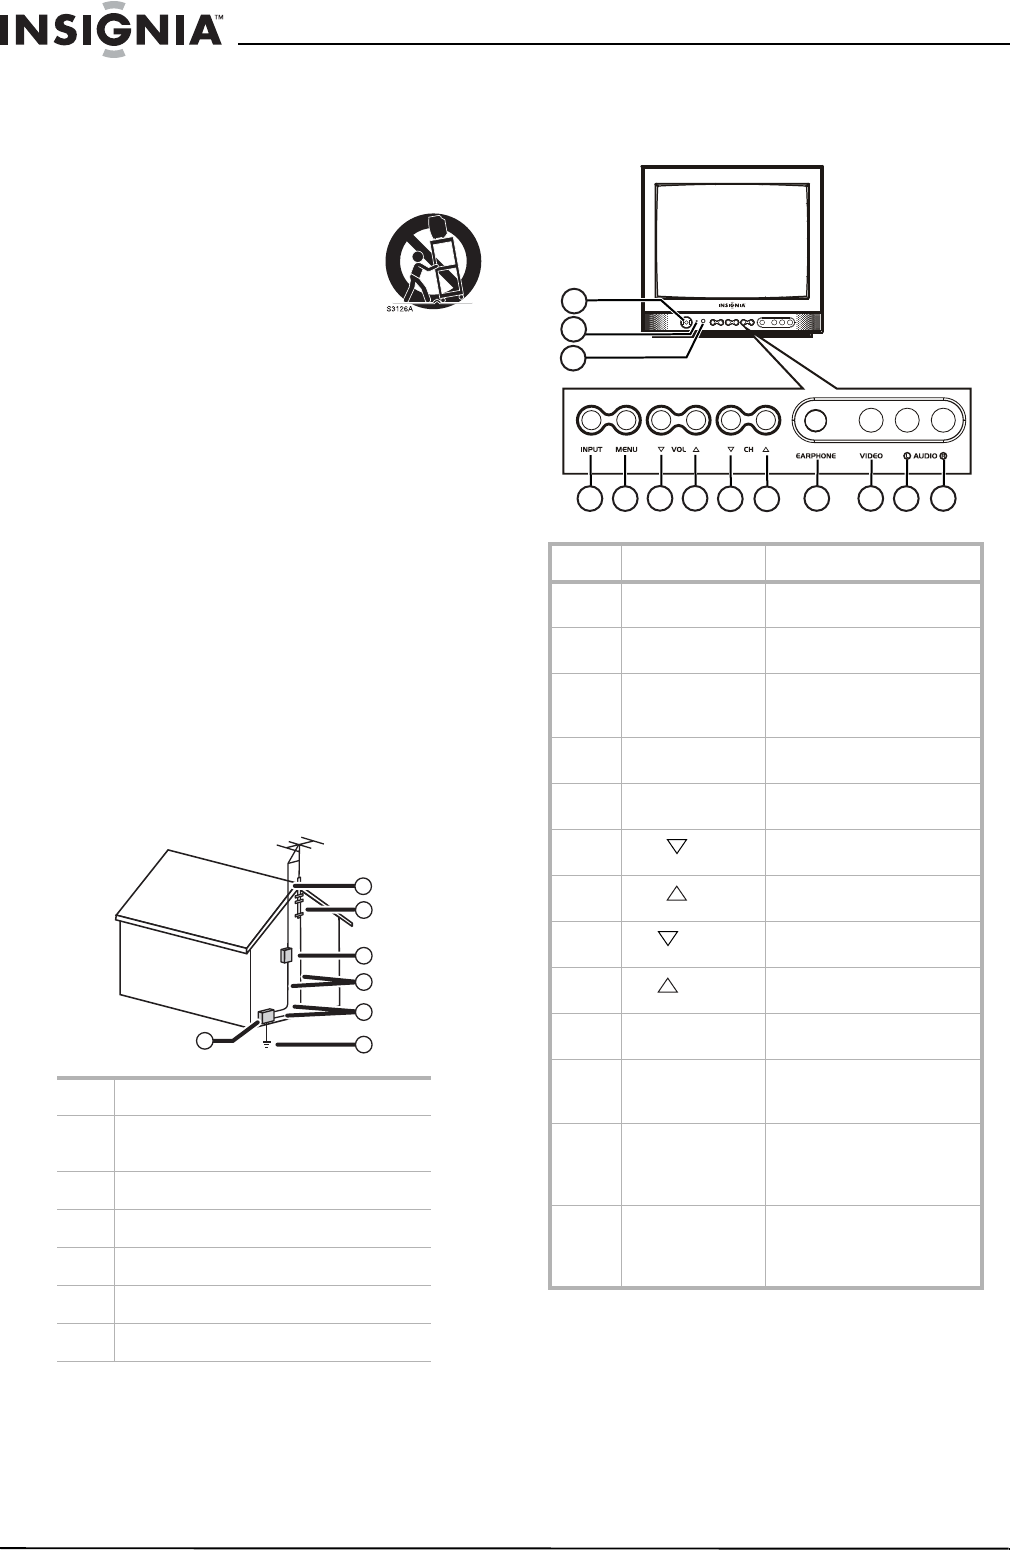
Features
Front
1 Electric service equipment
2 Power service grounding electrode
system
3 Ground clamps
4 Grounding conductors
5 Antenna discharge unit
6 Grounding clamp
7 Antenna lead-in wire
6
7
5
2
1
3
4
No. Component Description
1 Power button Press to turn your TV on or
off.
2 Power indicator Turns red when your TV is in
Standby mode.
3 Remote control
sensor
Receives signals from the
remote control. Do not
block.
4 INPUT Press to select the video
input source.
5 MENU Press to open the on-screen
display (OSD).
6
VOL
Press to decrease the
volume.
7
VOL
Press to increase the
volume.
8
CH
Press to change to a lower
channel number.
9
CH
Press to change to a higher
channel number.
10 EARPHONE Plug a set of headphones
into this jack.
11 VIDEO Plug a video cable into this
jack and into the VIDEO OUT
jack on an external device.
12 AUDIO L Plug the left audio cable into
this jack and into the left
AUDIO OUT jack on an
external device.
13 AUDIO R Plug the right audio cable
into this jack and into the
right AUDIO OUT jack on an
external device.
4 5
6
7
8 9
10 11
12
13
1
3
2


