


42
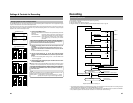
Recording
DAILY REC (Daily Recording)
DAILY REC allows recording to start/end automatically at a designated time on a daily basis.
Specify whether to use the DAILY REC feature using the DAILY REC item on the RECORDER MENU (1/2) screen.
Configuration
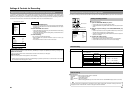
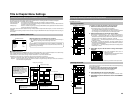
1.
Display the RECORDER MENU (1/2) screen.
2.
Set the DAILY REC item on the RECORDER MENU (1/2) screen to
ON.
● The DAILY REC configuration screen will be displayed.
3.
Set accordingly on the DAILY REC configuration screen.
START TIME : For setting the time to start recording (hr: min).
END TIME : For setting the time to end recording (hr: min).
1Change the set value.
Use the cursor buttons ( / / / ) on the main unit to highlight the 8or
9buttons on the configuration screen, followed by pressing the
/ button on
the main unit.
8:Value increases upon pressing the
button.
9:Value decreases upon pressing the
button.
2 Confirm set value.
Use the cursor buttons (
/ / / ) on the main unit to highlight the SET
button on the configuration screen, followed by pressing the SET button on the
main unit.
● This confirms the set values and the configuration screen disappears.
● The specified time will be displayed as the set value of the DAILY REC item.
* Select the NO USE button on the configuration screen, followed by pressing the
SET button on the main unit to clear the set values.
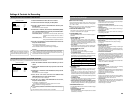
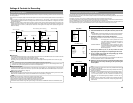
START TIME
SET
NO USE
08 29
:
hm
END TIME
19
00
:
hm
MENU
MANUAL
SET INTERVAL
Every05Min
AUTO CHAPTER (REC PAUSE)
ON
ENCODE QUALITY
SP
AUDIO ENCODE
NO AUDIO
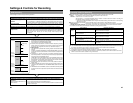
RECORDER MENU (1/2)
CHAPTER CREATION
TIMELAPSEREC
ON
TIMELAPSE MODE RECORDING SIZE:
--
Hour
--
Min
TL RecTime 1.0 sec / IntervalTime 002 sec
DAILY REC
ON
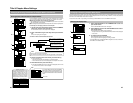
MENU
MANUAL
SET INTERVAL
Every05Min
AUTO CHAPTER (REC PAUSE)
ON
ENCODE QUALITY
SP
AUDIO ENCODE
NO AUDIO
RECORDER MENU (1/2)
CHAPTER CREATION
TIMELAPSE
REC
ON
TIMELAPSE MODE RECORDING SIZE: 200Hour 00Min
TL RecTime 1.0 sec / IntervalTime 002 sec
DAILY REC
08:29 19:00
RECORDER MENU (1/2) Screen
DAILY REC Configuration Screen
Confirm
RECORDER MENU (1/2) Screen
Set time
When the main unit is operated during DAILY
REC, a "DAILY RECORDING" and "DAILY REC"
message will be displayed respectively on the
monitor and LCD, and operation will be disabled.
To stop recording, press the STOP button for at
least 3 seconds.
Notes on the DAILY REC Feature
Performing DAILY REC
To perform DAILY REC, insert a recordable disc and set it to the Stop mode.
Next, set this unit to the Operate ON mode.
ⅥIt will switch automatically to the Record Pause mode approximately 10 seconds
before recording starts.
Ⅵ Recording will start automatically upon reaching the start time.
Ⅵ Recording will end automatically upon reaching the end time.
• If the EDIT MENU item on the DVD MENU screen is set to ENABLE, the
Chapter Edit menu screen will appear.
The above operation will be repeated on a daily basis.
Ⅵ To cancel the DAILY REC mode, set the DAILY REC item on the RECORDER
MENU (1/2) screen to NO USE. When the power is turned OFF, the DAILY REC
settings will be cleared and automatically set to NO USE.
●Set the start time for recording to at least 30 seconds later than the current time when configuration is performed.
●The unit switches to the Record Pause mode approximately 10 seconds before recording starts. DAILY REC will not start if
STOP is executed when in the Record Pause mode. Additionally, recording will not stop at the preset end time if it is started
manually while in the Record Pause mode.
●Recording will be performed as follows when it is started manually at a time before the unit switches automatically to the
Record Pause mode (at least 10 seconds prior to the preset start time).
When a start time is preset, recording will not stop at the preset end time.
When a start time is not preset, recording will stop at the preset end time.
●Recording may be discontinued if DISC FULL or SELL FULL occurs before the preset end time.
●There may be a difference of 1 ~ 3 seconds in the start/end time of recording.
●When recording is set to last for almost 1 full day, do so upon taking into account the time required for REC STOP and TITLE
CLOSE processes. Set the end time and start time for the next recording such that they are at least 10 minutes apart from each
other.
When sufficient interval is not created (as illustrated in the example below), recording on the following day may not be executed.
(Example) Start Time 0:00 End Time 23:59
43
Finalizing (for Playback on Other DVD Players)
Finalize a disc recorded using this DVD recorder as described below in order to ensure that it can be played on other DVD players.
In the case of DVD-RWs, playback will be possible on DVD players that support video mode.
After finalizing a disc;
● No additional recording will be possible.
● The title menu cannot be changed.
● The titles created before finalizing will be displayed as the top menu.
Finalizing
The process of finalizing can be carried out in two different ways.
● Select DISC MENU and then FINALIZE from the Setup Menu.
● Select FINALIZE on the REC CONTROL panel when this is being used for recording.
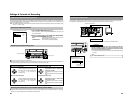
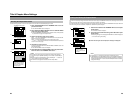
Setup Procedure: Insert the disc to be finalized.
1.
If using the Setup Menu:
1.
If using the REC CONTROL panel : (Only VIDEO
LINE OUT or Y/C out terminal)
MENU
FINALIZE
EXECUTE
CANCEL
CANCEL DISC FINALIZATION
CANCEL
DISC ERASE (QUICK)
CANCEL
DISC ERASE (FULL)
OFF
AUTO FINALIZE
OFF
AUTO CANCEL DISC FINALIZ.
DISC
MENU
000 min
04/05/04
11:20:00
TITLE 01 0:11:22
DVD-RW
CHAPTER
01 0:11:22
REC
FINALIZE
DISC
TITLE
qPress the SET UP button to
display the Setup Menu, and
then select DISC.
wSet FINALIZE from the DISC
MENU screen to EXECUTE
and then press the SET button.
Select FINALIZE and then press
the keyboard’s Enter key.
FINALIZE button
The screen that will now be displayed depends on the setting of EDIT MENU from the DVD MENU screen.
When DISABLE is set, finalization starts. If this is set to ENABLE, a screen for editing title menus will
appear. Use this screen to confirm that the title menu is as
required, to modify the display style, and to input title
names. (☞ Page 50)
● The message “PLEASE WAIT” will be displayed on the monitor during finalizing.
The message “WAIT” will appears on the DVI OUT terminal.
● The message will disappear when finalization has been completed and the
normal screen display will then be restored.
(The REC CONTROL panel will not be displayed.)
Ⅵ Select NO from the confirmation screen to cancel finalizing and return to the
previous screen.
Notes
● A maximum of 20 minutes will be required to complete finalizing.
● When finalizing is carried out, all of the disc’s recorded video and audio are
stored in accordance with the DVD Video Standard; accordingly, this content
can also be replayed as DVD video.
● Although a disc finalized using this DVD recorder may in principle be played
on other DVD players, there is no guarantee that all of its content will be
playable.
● When the AUTO FINALIZE item on the DISC menu screen is set to ON,
finalization will be automatically performed when ejecting the disc. (When
the EDIT MENU item on the DVD MENU screen is set to DISABLE.)
● In the case of a DVD-RW/DVD+RW, it is possible to cancel the finalization
and make an additional recording. (☞ page 28.)