


62
Setup Menu
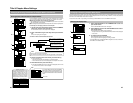
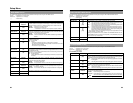
DISC MENU Screen
The following table identifies and describes the parameters that may be set using the DISC MENU screen.
Top half : Appearance on monitor screen
Bottom half : Appearance on LCD display
[ ] : Default setting
Parameter Possible settings Description
FINALIZE [CANCEL]
EXECUTE
FINAL [CAN]
EXE
CANCEL DISC [CANCEL]
FINALIZATION EXECUTE
CAN FIN [CAN]
EXE
AUTO FINALIZE [OFF]
ON
AFINAL [oFF]
oN
AUTO CANCEL [OFF]
DISC FINALIZ. ON
ACAN FI [oFF]
oN
DISC ERASE [CANCEL]
(QUICK) EXECUTE
q ERASE [CAN]
EXE
DISC ERASE [CANCEL]
(FULL) EXECUTE
F ERASE [CAN]
EXE
MENU
MENU
This parameter is selected to finalize a disc to be finalized. If a disc recorded using
this DVD recorder is to be played on a DVD player, it must first be finalized. Once
finalizing has been carried out, no addition recordings can be made on the disc.
CANCEL : Finalizing is not to be carried out.
EXECUTE : Finalizing is to be carried out.
*A maximum of 20 minutes will be required to complete finalizing.
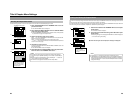
Select whether to cancel the finalization of a finalized DVD-RW / DVD+RW. To add a
recording to a finalized DVD-RW / DVD+RW set to EXECUTE. A DVD-RW / DVD+RW
finalized on another machine cannot be canceled.
CANCEL : Do not cancel the finalization.
EXECUTE : Cancel the finalization. The TOP MENU created during finalization is
deleted.
For selecting whether to finalize automatically when ejecting the recorded disc using
the OPEN/CLOSE button.
OFF : Do not finalize
ON : Finalize
* Finalization processes may take up to 20 minutes to complete.
* The disc will be ejected without being finalized if the EXIT item on the Title
Menu Edit screen is selected.
* This function is only for DVD±RW.
For selecting whether to cancel finalization automatically when a finalized DVD-RW/
DVD+RW disc is inserted. Set this to ON when recording additional data to a finalized
DVD-RW/DVD+RW disc.
Cancellation is not possible for DVD-RW discs that are finalized using other devices.
OFF :Do not cancel finalization
ON :Cancel finalization
The Top Menu that has been created during the finalization process will also
be erased.
Select whether to do a quick erase on a DVD-RW / DVD+RW. A quick erase only
deletes the DVD-RW / DVD+RW disc control area. The time required is shorter than
a full erase, and the disc data is deleted.
CANCEL : Do not do a quick erase.
EXECUTE : Do a quick erase. The disc can be newly recorded from the beginning.
Select whether to carry out a full erase on a DVD-RW / DVD+RW. All areas of a
DVD-RW disc are deleted. If a disc is to be used repeatedly delete using this item.
CANCEL : Do not do a full erase.
EXECUTE : Do a full erase. The disc can be newly recorded from the beginning.
This button is used to return to the Setup Menu screen.
63
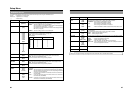
SYSTEM MENU Screen
The following table identifies and describes the parameters that may be set using the SYSTEM MENU screen.
Top half : Appearance on monitor screen
Bottom half : Appearance on LCD display
[ ] : Default setting
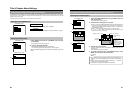
SYSTEM MENU (1/2) screen
Parameter Possible settings Description
SETUP OFF
[ON]
SETUP oFF
[oN]
TEST SIGNAL [OFF]
ON
TEST S [oFF]
oN
FACTORY [CANCEL]
SETTING EXECUTE
FACTRY [CAN]
EXE
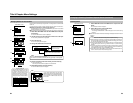
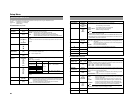
INPUT SELECT MENU Screen
The following table identifies and describes the parameters that may be set using the INPUT SELECT MENU screen.
Top half : Appearance on monitor screen
Bottom half : Appearance on LCD display
[ ] : Default setting
Parameter Possible settings Description
INPUT SELECT LINE
Y/C
DV
[DVI]
INPUT LINE
YC
dV
[dVI]
MENU
MENU
This parameter is used to select the audio and video input signals.
LINE : The composite video signal from the VIDEO LINE IN terminal and the analog
audio signals from the AUDIO IN terminals are to be used.
Y/C : The YC separate signal from the Y/C IN terminal and the analog audio signals
from the AUDIO IN terminals are to be used.
DV : The digital video and audio signals from the DV IN/OUT terminal are to be used.
DVI :For input of the digital video signals from DVI IN terminal. The resolution of the input
signal will be determined automatically (SXGA or XGA). Input the analog audio
signals from the AUDIO IN terminal for sound input.
* The front-panel indicator corresponding to the type of input signal selected on this
screen will light up or start to flash.
Setting of this parameter will not be possible when REMOTE SELECT from the
REMOTE MENU screen has been set to DV(SLAVE), or DV(TRIGGER). DV signals
will be used for input at these times
This button is used to return to the Setup Menu screen.
This parameter is used to indicate whether or not a setup signal is to be added to analog
video (i.e., composite or YC separate) during the recording process. The actual setting depends
on whether the input analog signal contains a setup signal. (NTSC ouly)
OFF : This setting should be made when the input analog signal does not contain
a setup signal.
ON : This setting should be made when the input analog signal contains a setup signal.
This parameter is used to indicate whether or not the color bar output by the DVD
recorder’s internal signal generator is to be displayed.
OFF : The color bar is not displayed and video from the VIDEO LINE IN terminal is
output to the monitor.
ON : The color bar is displayed. Use this setting when the color bar is to be recorded.
This parameter is used to indicate whether or not all setup menu parameters are to
be returned to their default settings.
CANCEL : Default settings are not to be restored.
EXECUTE : Default settings are to be restored. However, the current set values for
the TV TYPE item on the SYSTEM MENU (2/2) screen will not be erased.
The system must be restarted after this parameter is changed.
Note