


21
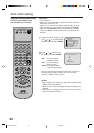
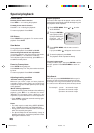
Auto clock setting
The Auto Clock feature enables the automatic clock setting and updating, and also to set the Time Zone
and Daylight Saving Time by receiving XDS (Extended Data Service) information carried on the channel
signal.
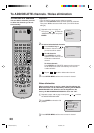
Press SETUP MENU. The VCR menu screen will appear.
Press or to select the SYSTEM SET UP menu, then
press ENTER.
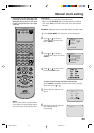
2
Press or to select the
“STANDARD TIME” option, then
press ENTER.
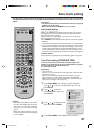
After Auto Clock setting, in some case
the clock may display the other time
zone’s. You can correct the clock by
selecting your Time Zone setting
above.
When the clock is not set or you set
the clock manually, Time Zone setting
is not available.
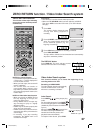
NOTES:
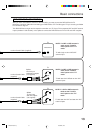
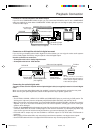
You must set the antenna connection before the AC cord plug is
inserted into the AC outlet.
Make sure the AUTO CH MEMORY (on P.19) is done.
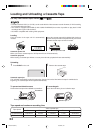
1
Preparation:
Auto clock setting
WAIT 30 MINUTES!
when the power switch is off, after the
connections of the antenna and the power plug. Because the Auto
Clock setting feature is activate.
After the clock is set automatically, you may have to set the Time
Zone and Daylight Saving Time.
Press POWER to turn on the DVD/VCR after the Auto Clock operation
completed.
When shipped from factory, the AUTO CLOCK option is set to ON position.
If you turn the DVD/VCR on during Auto Clock setting, the clock is not set.
With cable box connection, if the Auto Clock Setting is unsuccessful,
please select the PBS channel carrying the XDS information, then
turn the DVD/VCR off. After 30 minutes, turn the DVD/VCR on, and
if the clock is not set automatically, set the clock manually. (See page 23)
•
•
•
Canadian Viewers:
Please see note regarding the Auto Clock Setting option on page 55.
3
Press or to select your Time
Zone, then press the ENTER.
Time Zone setting (STANDARD TIME)
4
Press SETUP MENU until the MENU screen is cleared.
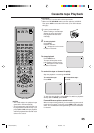
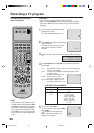
•
•
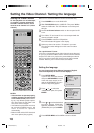
Turn ON the TV.
When a TV is connected with an audio/video cable, select the video
input mode on the TV.
When a TV is connected only with an antenna cable, set to the
video channel 3 or 4. Then select VCR position with TV/VCR.
Make sure the VCR mode has been selected. (Is the VCR indicator
being light?) (see steps 1~2 on page 18)
Preparation:
•
•
•
•
In the rare event that you live within broadcast range of two
stations in two different time zones, the DVD/VCR may recognize
the wrong station for the AUTO CLOCK set.
To correct the situation:
〈+/-/ENTER/MENU〉
SYSTEM SET UP
CLOCK SET
LANGUAGE/IDIOMA/LANGUE
NO NOISE BACKGROUND
AUTO CLOCK
STANDARD TIME
ON OFF
ON OFF
DAYLIGHT SAVING TIME
〈+/-/ENTER/MENU〉
STANDARD TIME
ATLANTIC
CENTRAL
PACIFIC
EASTERN
MOUNTAIN
ALASKA
HAWAII
AUTO
•
•
T
V
/
V
C
R
C
H
+
TV
VCR
DVD
POWER
DVD MENU
MARKER RETURN
OPEN/
CLOSE
DISPLAY A.TRK
C.RESET
ZERO RETURN
SUB TITLE
ANGLE
SEARCH
MODE
SP/EP
PLAY
MODE
ZOOM TITLE
REPEAT
A-B
TV
POWER
INPUT
TV VOL
0
TIMER
TV/VCR
REW
PLAY
FF
REC
STOP
PAUSE
SKIP
/INDEX
SKIP
/INDEX
T
V
/
V
C
R
C
H
—
SET SET
ENTER/
SELECT
SET UP
MENU
CANCEL
OSD
A.MONITOR
SLOW
SKIP
SEARCH
VCR/DVD/TV
2B00401BE(16-21) 22/5/2002, 17:1621