


E-31
PREPARATION
–
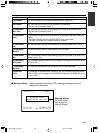
Setting/displaying date and time
–
This function sets up the date and time data of the built-in clock. With the built-in chargeable
battery, the configured date and time data is maintained even after the main power is turned
off. The data will be displayed on the monitor according to the menu setting. During tape
recording, the time and date data is registered.
SET
MENIU
EJECT
REC PLAY
PAUSE
REW
STOP
FF
DVCAM NTSC
PA L
REC INH.
CH-1/3
CH-2/4
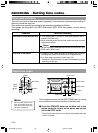
BR-DV3000
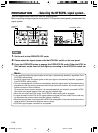
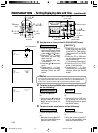
1.
EJECT button
2.
–
2
PAUSE/FF
button
2.
–
1
PLAY/STOP
button
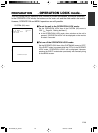
DISPLAY
BARS
MENU SEARCH+
SEARCH–
SET
BLANK
STILL
MODE
AUDIO
MUTING
OUT SEL.
OUT LEV.
2.
– 1 button
1.
MENU
button
2.
– 2 button
2.
– 1 button
2.
– 2 SET
button
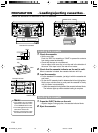
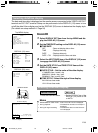
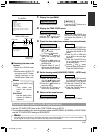
–––MENU–––
SYSTEM. .
REMOTE. .
AUDIO/VIDEO. .
TIME CODE. .
DISPLAY SET..
CLOCK ADJUST..
FACTORY SETTING CANCEL
DRUM HOURMETER 000000
EXIT
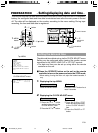
–––CLOCK ADJUST–––
DATE (DD/MM/YY) 10/10/02
TIME 00:00:00
PAGE BACK
Top MENU
CLOCK ADJUST menu
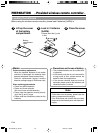
Setting the date and time
The date and time data is set up via the CLOCK ADJUST menu.
Setting can be performed while viewing the monitor screen
connected to the VIDEO LINE OUT or Y/C OUT terminal.
• The date and time can be set up using either the remote
controller or the unit.
Ⅵ Press the OPERATE button on the unit or the remote
controller to turn on the power and enter the STOP mode.
* When setting it using the main unit, eject the loaded cassette, if
any.
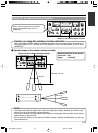
1.
Displaying the top MENU.
Main unit
Press the EJECT button for at
least 2 seconds.
Remote controller
Press the MENU button.
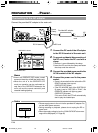
2.
Displaying the CLOCK ADJUST menu.
Remote controller
1
Press the
ᮡ
or
ᮢ
button
and bring the cursor to the
CLOCK ADJUST item.
2
Press the SET or
ᮣ
button.
Main unit
1
Press the PLAY or STOP
button and bring the cursor
to the CLOCK ADJUST
item.
2
Press the PAUSE or FF
button.
BR-DV3000_E_p03-49 06.8.24, 1:38 PM31