


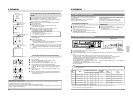
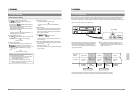

42
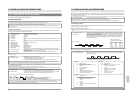
VTR MODE
(SHARPNESS) NORMAL
(VIDEO MODE) AUTO
(AUTO REC) OFF
(REC CHECK) MANUAL
(TAPE END MODE) STOP
(INDEX SEARCH) ON
(INDEX AL/SKIP) ALARM
(TAPE END BUZZER) OFF
(WARNING BUZZER) OFF
PRESS (SHIFT, SET)
PRESS (MENU) TO END
PAL
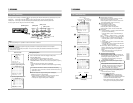
8-4 Index Search
Searching the index code (VISS signal) recorded at the
start of alarm recording helps you quickly locate alarm
recordings (index search function).
• To use the index search function, set the function menu
switch [INDEX SEARCH] to ON.
5
When reverse shuttle search or fast-forward shuttle
search is executed, the Index Search mode is engaged.
When an index code is located, playback starts
automatically.
When the function menu switch [NOISELESS PLAY] is
set to OFF, playback takes place in the 3H mode
regardless of the set playback mode. When set to ON,
playback takes place in the playback mode set with the
TIME MODE button.
To engage the Reverse Shuttle Search mode or the
Fast-Forward Shuttle Search mode, press the
[REW] or [FF] button once during playback.
5
When an index code is searched in the Fast-Forward
mode or the Rewind mode, the Stop mode is
automatically engaged when the code is located.
• The VISS indicator is shown on the display whenever
the Index Search mode is engaged.
Index Search does not function in the Auto Rewind
mode.
When the picture moves up and down in the
Still mode
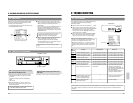
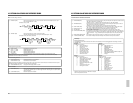
Press the [V. LOCK +/-] button to minimize vertical jitter.
When noise appears in the picture in the Play/
Field Advance Play/Search mode
Tracking can only be adjusted in the following modes:
• VHS Standard (3H) Play, Long Play (LP), 12H and
24H mode
• Field Advance Playback with the [PAUSE/STILL]
button
• Search mode
Ⅲ
Press the [TRACKING +/-] button to reduce noise.
To restore the tracking preset mode, press the + and -
buttons simultaneously.
*Tracking adjustment cannot be performed in the
L12H/L24H Timelapse Play modes.
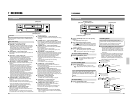
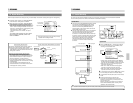
8-5 Tracking/V. Lock Adjustment
[TRACKING +/-] button
[V. LOCK +/-] button
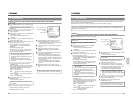
8 PLAYBACK AND SPECIAL-EFFECTS PLAYBACK
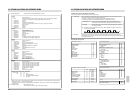
VTR mode 1 setting screen
Set to
ON
INDEX
SEARCH
43
VTR MODE 1
(SHARPNESS) NORMAL
(VIDEO MODE) AUTO
(AUTO REC) OFF
(REC CHECK) MANUAL
(TAPE END MODE) REPEAT
(INDEX SEARCH) OFF
(INDEX AL/SKIP) ALARM
(TAPE END BUZZER) OFF
(WARNING BUZZER) ON
PRESS (SHIFT, SET)
PRESS (MENU) TO END
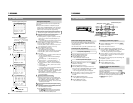
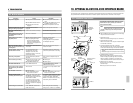
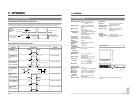
9 TROUBLESHOOTING
9-1 Error Indication
Error indications are shown on the display whenever there
are problems with cassette loading, unloading or
mechanism operation.
5
When a problem occurs, the error indication E-
– –
blinks.
5
When any one of the error indications is shown, a 12 V
warning signal is output from the rear panel's WARNING
OUT connector (for E-01 to E07, and E-11 during
recording) (only when the <TERMINAL SEL 2> menu
function switch is set to "WARN").
5
When the function menu switch <WARNING BUZZER>
is set to ON, the buzzer sounds whenever a problem
occurs (for E-01 to E07, and E-11 during recording).
When an error indication appears or the buzzer
sounds, turn the operating mode off and then on again
to clear the error indication and buzzer sound.
When the error indication E-
– –
is shown, turning the
operating mode on again may not clear the problem. In
this case, consult your local JVC dealer (for E-01 to E-
07).
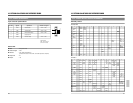
Contents
Problem with loading operation
Problem with unloading operation
Problem with supply reel rotation
Problem with drum rotation
Problem with take-up reel rotation
Problem with capstan rotation
Problem with eject operation
Error with recording check
(inferior recording performance)
Insufficient capacity of the built-in
battery for backup (Displayed
only in the operating off mode.)
No video signals input to the
[VIDEO IN] connector
Error
indication
E-01
E-02
E-03
E-04
E-05
E-06
E-07
E-09
E-10
E-11
VCR operation
The operating mode is turned off.
The operating mode is turned off.
The operating mode is turned off.
The operating mode is turned off.
The operating mode is turned off.
The operating mode is turned off.
The operating mode is turned off.
Cleans the heads with the VCR's
head cleaner.
—
—
Measures
Turn the operating mode on again.
Turn the operating mode on again.
Turn the operating mode on again.
Turn the operating mode on again.
Turn the operating mode on again.
Turn the operating mode on again.
Turn the operating mode on again.
Cleans the heads with the head
cleaning tape, then check the
recording picture quality again. The
tape may be defective. Replace the
tape and check again.
If the picture quality is still inferior,
consult your local JVC dealer.
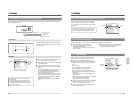
TIME MODE
Display section
Error indication
This unit uses a microprocessor and may not function properly if there is external noise or interference. In this case, turn
the operating mode off and unplug the power cord from the AC outlet. Then plug the power cord in again and check
operation.
Contact your local JVC dealer to
replace the built-in battery.
Input video signals.
Buzzer sound
VTR mode 1 setting screen