


26
PAL
7 RECORDING
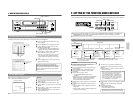
7-1 Preparation
Connection
Make sure the input/output connectors on the rear panel are
properly connected. For details, refer to "CONNECTIONS" on
page 13 to 15.
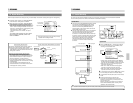
Menu switch setting
Set the function menu switches as required.
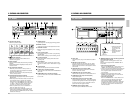
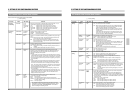
5
<POSITION> ... Factory setting: L-UP
• Sets the position of the on-screen time/date and recording
mode display. Select one of the four corners of the screen.
During recording, the on-screen data is recorded in the
selected position together with the video signals.
• If on-screen data recording is not required, set this switch
to OFF.
5
<VIDEO MODE> ... Factory setting: AUTO
Set to "B/W" to record colour video signals in the Black and
White mode.
5
<AUTO REC> ... Factory setting: OFF
• Set to ON to execute timer recording using a commercially
available external timer or to automatically resume
recording when power is restored after a power failure.
• For details, refer to "How To Restore Recording After
Power Failure" and "External Timer Recording" on page 39.
5
<REC CHECK> ... Factory setting: MANUAL
Selects between manual and automatic Recording Check
operation.
• When set to AUTO, Recording Check is automatically
executed at the beginning of a tape set to record
repeatedly or when inferior picture quality is detected. In
the Auto mode, Recording Check and head cleaning is
automatically repeated up to two times. If the inferior
picture quality is detected on both checks, the warning
code E-09 is displayed. The warning code remains
displayed while recording continues.
• When set to MANUAL, the Recording Check operation is
executed only when the [REC CHECK] button is pressed.
If inferior picture quality is detected, head cleaning is
performed once and recording resumes. The warning
code "E-09" is shown on the display for 10 seconds.
5
<TAPE END MODE> ... Factory setting: STOP
Selects the mode engaged when the tape ends during
recording.
• When set to STOP, the Stop mode is engaged.
• When set to REW, the tape is rewound to the beginning.
• When set to REPEAT, the tape is rewound to the
beginning and recording re-starts (repeat recording).
• When set to EJECT, the tape is ejected.
5
<INDEX AL/SKIP> ... Factory setting: ALARM
Sets the timing for recording of the index code.
When set to "ALARM", the code is recorded at the time of
the alarm signal input.
When set to "SKIP", it is recorded once each hour during
the actual duration of the recording. (This is unrelated to the
recording mode time.)
5
<TAPE END BUZZER> ... Factory setting: OFF
• Set to ON to sound the buzzer when the tape ends during
recording.
5
<TERMINAL SEL 1> ... Factory setting: SERIES
Set the rear panel
’s [SERIES/CLOCK] terminal as required.
• Set to “SERIES” when to use the series recording function.
• Set to “EXT” when to control recording start/stop from an
external device.
5
<TERMINAL SEL 2> ... Factory setting: WARN
Select the signal output from the rear panel
’s [WARNING/
REC OUT] terminal.
• Set to WARN to output a warning signal.
• Set to “REC” to output a recording mode signal (+12 V)
during recording.
5
<REC REMAIN> ... Factory setting: OFF
Select the timing to send the tape end information. Choose
from tape end (OFF), about 3 minutes before the tape end
(180S) or about 6 minutes before the tape end (360S).
When the tape reaches the selected position during
recording, the following information is output.
• Tape end signal from the rear panel
’s [TAPE END OUT]
terminal
• Series recording signal during series recording
• Tape end buzzer
•“End” indication in the counter display
5
<CAMERA SW> ... Factory setting: OFF
Sets the switching timing for cameras connected to an
external sequential switcher.
• To switch cameras after each field or frame, set this menu
switch to FIELD or FRAME.
5
<CAM SW WIDTH>... Factory setting: 5 msec
Sets the output time for the camera switching signal to be
output to the external sequential switcher during recording.
When set to "5msec", the output time becomes 5 msec in
the 3/12/24H recording mode. When set to "20msec", the
output time becomes 5 msec in the 3H recording mode, and
20 msec in the 12/24H recording mode.
5
<ALARM REC> ... Factory setting: OFF
• Set to ON to perform alarm recording.
For details, refer to "Alarm Recording" on page 33.
5
<SENSOR REC> ... Factory setting: OFF
• Set to ON to perform sensor recording.
For details, refer to "Sensor Recording" on page 35.
5
<TIMER ALARM>...Factory setting: ON
Sets whether or not the alarm signal input should be
enabled during timer recording.
When set to "OFF", alarm signal input is disabled, and
when set to "ON", the alarm signal input is enabled.
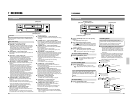
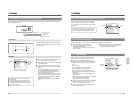
Setting on the front panel
• Select the recording time mode with the [TIME MODE]
button. For details, refer to "Selection of the Record/Play
mode" on page 25.
[MENU] button
[TIME MODE] button
27
PAL
7 RECORDING
7-2 Recording
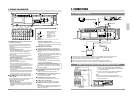
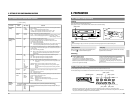
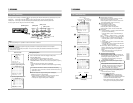
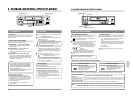
[REC CHECK] button
Error indicator E-09 display
During
recording
Recording
Normal
Recording
Defective
Recording
check
Display
Defective
During
recording
Recording
check
Defective
Error indicator E-09 (for 10 sec.)
[REC CHECK] button
ⅷ
When set to MANUAL
ⅷ
When set to AUTO
Recording Check
Record Check in the Timelapse mode should be
performed after recording has been executed for more
than one minute. If the recording time is too short,
Record Check cannot be performed correctly.
5
Press the [REC CHECK] button during recording.
[
The tape is played back in reverse for about 4
seconds, then, the Play mode is engaged to check
the recording. After playback, the VCR enters the
Record mode at the point where the recording was
interrupted.
• During Recording Check, the FM level of the signal
recorded on the tape is checked in the Play mode to
determine whether or not the recording quality is
suitable. If the recording quality is judged inferior,
subsequent operation depends on the setting of the
<REC CHECK> function menu switch.
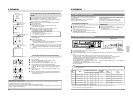
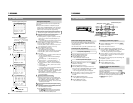
[OPERATE] button
[REC CHECK] button
[STOP/EJECT] button
[REC] button
[PLAY] button
[PAUSE/STILL] button
Note
If the VCR is left in the Record Pause mode for
more than 5 seconds, the transition between
scenes may be distorted when recording is re-
started.
Press the [OPERATE] button to turn the operating
mode on.
[
The [OPERATE] indicator lights.
Insert a cassette with safety tab in place.
[
The (
) cassette indication lights on the display.
* If a cassette is loaded when the operating mode is off,
the operating mode is switched on automatically (auto
operate on function).
Press the [REC] button to start recording.
[
The recording indicator lights on the display,
showing that the Record mode is engaged.
To stop recording temporarily
Press the [PAUSE/STILL] button.
[
The record-pause indicator is shown on
the display and the Pause mode is
engaged.
To start recording again
Press the [PLAY] button.
[
The recording indicator is shown on the
display and the Recording mode is engaged.
To stop recording
Press the [STOP/EJECT] button.
[
The tape stops and the Stop mode is engaged.
Recording
check
Recording
Normal
Auto head
cleaning
Normal
Auto head
cleaning
Auto recording
for about 7
seconds
Auto head
cleaning
Recording
Recording