8
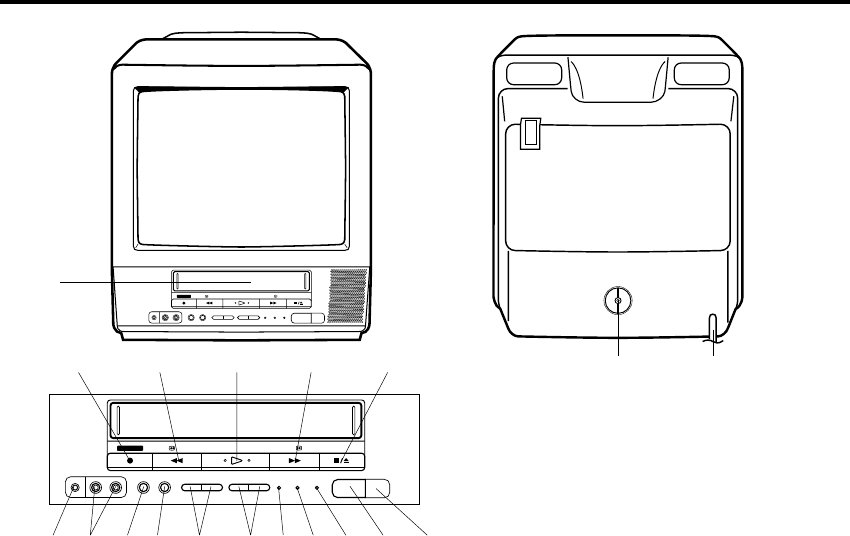
LOCATION OF CONTROLS
REARFRONT
REC
/
ITR REW
PHONES
INPUT SP/EP
–
CHANNEL
+
–
VOLUME
+
RECREC TIMER ON TIMER
VIDEO
–
IN
–
AUDIO
PLAY FF
POWER
STOP/EJECT
8 9 15 1610 11 12 13 14 177
23 654
REC / ITR REW
PHONES
INPUT SP/EP
–
CHANNEL
+
–
VOLUME
+
RECREC TIMER ON TIMER
VIDEO
–
IN
–
AUDIO
PLAY FF
POWER
STOP/EJECT
1
ANT
18 19
FRONT:
1. Cassette Loading Slot - To insert or remove a
video tape.
2. REC
/
ITR Button - Press once to start normal
recording. Additional presses activate Instant Timer
Recording.
3. REW (Rewind) Button - In the Stop mode, this
button rapidly winds the tape backwards. In the Play
mode, this button activates reverse search.
4. PLAY Button - Press to play a prerecorded tape.
5. FF (Fast Forward) Button - In the Stop mode, this
button rapidly winds the tape forward. In the Play
mode, this button activates forward search.
6. STOP/EJECT Button - Press once to stop the tape
in any mode. Press again to eject the tape.
7. Headphone Jack - Plug monaural headphones or
an earphone with an 1/8" miniplug into this jack for
private listening.
8. AUDIO/VIDEO IN Jacks - Audio and video signal
cables from an external source can be connected
here.
9. INPUT Selector Button - Switches the program for
viewing between the VCR and an external input
source.
10. SP/EP Selector Button - Sets the tape speed for
recording.
11. CHANNEL + / – Buttons - Press to select a channel
for viewing or recording.
12. VOLUME + / – Buttons - Press to raise or lower the
volume of the sound.
13. REC Indicator - Lights when the TV/VCR is record-
ing.
14. REC TIMER Indicator - This lights when the TIMER
button is pressed.
15. ON TIMER Indicator - This indicator lights up when
the powered up. It also lights up when ON TIMER
program is turned ON while power is OFF.
16. POWER Button - Press to turn the TV/VCR on or off.
17. Remote Sensor - Signals from the Remote Control
are received here.
REAR:
18. VHF/UHF Antenna Jack - Connect the 75 ohm
coaxial cable from the antenna or Cable TV service
to this jack.
19. AC Power Cord - Connect to a 120V, 60Hz outlet.
DESCRIPTION OF CONTROLS
5B20401A-E/P01-09 1/10/02, 4:53 PM8


