


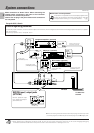


DM-9090 (En)
13
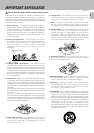
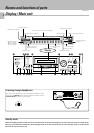
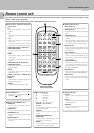
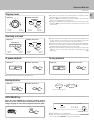
1 POWER key
: Press to turn the unit ON and OFF.
: The unit may enter the standby mode when the POWER key
is pressed to turn it ON. This is because the unit holds the
memory that it has been put to the standby mode by the
remote control unit in the last operation.
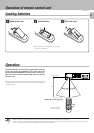
2 Remote control sensor
3 EDIT/SPACE keys ¤
EDIT:
: Press to switch the editing mode ON/OFF.
SPACE:
: Press to insert a blank space character during the title input
operation.
4 TITLE INPUT key r
: Press to switch the title input mode ON/OFF.
5 TITLE SEARCH key &ty
: Press to switch the title search mode ON/OFF.
: During title editing, press to switch the title change input
mode between the “overwrite mode” and “insert mode”.
6 JOG DIAL (Jog dial) &(¤
Skip down (4)/ Skip up(¢) knob
: During playback, press to skip tracks.
: Before starting recording in record mode, rotate to select the
recording setting adjustment mode.
: During title search, rotate to select a track number.
: During title input, rotate to select a track number or a
character.
: During editing, rotate to select the editing mode or a track
number.
PUSH SET knob: ¤
: For use in setting the editing result and input title in memory.
7 REC MODE/CHARA. (Character) keys ¢t
REC MODE:
: Press to switch the recording setting adjustment modes
(record modes) ON/OFF.
CHARA. :
: Press to select a character group during the title input
operation.
8 ENTER key ‹
: For use in executing the editing and title input operations.
9 REC LEVEL knob ¶
: Rotate to adjust the analog recording level.
0 REC BALANCE knob ¶
: Rotate to adjust the analog recording balance.
! PHONES jack
: Connect stereo headphones (optional) here.
@ PHONES LEVEL knob
: Rotate to adjust the volume of the headphones.
# TIMER switch
: This switch is used in timer playback and timer recording.
$ REC INPUT key §
: Press to switch the recording input line between digital
(optical/coaxial), analog and monaural.
% MONITOR key £
: Press to monitor the sound being input from the source
while the unit is in stop mode.
^ FADE/DELETE keys •y
FADE:
: Press to switch the fade mode ON/OFF.
DELETE:
: During title editing, press to delete a character. During track
editing, press to delete a track.
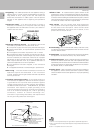
& Mini Disc insertion slot
: When a Mini Disc is inserted while the unit is in the standby
mode, it is turned ON automatically.
* Eject (0) key
: Press to eject the Mini Disc.
( Manual search down (1) key (y
: This key also functions as the fast reverse key during
playback.
: During an editing mode, press to move the title input
cursor or to scroll the track title display to the left.
) Manual search up (¡) key (y
: This key also functions as the fast forward key during
playback.
: During an editing mode, press to move the title input
cursor or to scroll the track title display to the right.
¡ Pause (8) key
: Press to let playback or recording pause temporarily.
™ Stop (7) key
: Press to stop playback or recording.
£ Play (3) key
: Press to start playback.
¢ Record (¶) key
: Press to start recording.
In stop mode :
: When the ¶ key is pressed while a recordable disc is present
in the unit, it enters record-pause mode.
(It enters record-pause mode at the position immediately
after the last existing track.)
In record-pause mode :
: When the ¶ key is pressed, recording starts by creating a
new track from the current position. The track number is
incremented by “1”.
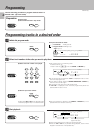
Description of main unit keys
Names and functions of parts