10
4 GETTING ACQUAINTED
PF
F LOCK
A
1
C
H
1/R
E
C
2
C
H
2/R
EC
3
C
H
3
/R
E
C
4
T
O
N
E
/S
EL
5
M
E
TE
R
6
C
TC
SS
/S
E
L
7
N
B
/LE
V
E
L
8
A
G
C
/O
F
F
9
FIN
E
/S
TEP
.
D
C
S
/S
E
L
0
S
H
IF
T
/O
F
F
S
E
T
EN
T
SEND
PHONES
MIC
AT
ANT1/2
PROC
LEVEL
VOX
ATT
PRE
LEVEL
LEVEL
LEVEL
MANUAL
LO/
WIDTH
HI/
SHIFT
N.R.
A.N.
B.C.
F
U
N
C
CALL
C.IN
CLR
MAIN
AUTO
CAR
TX MONI
DELAY
NAR
REV
MIC
PWR
KEY
LSB
USB
CW
FSK
FM
AM
SUB
DISP
SEL
1MHz
CTRL
MR
MG.SEL
M.IN
QUICK MEMO
M
/S
R
EV
TRACE
M
AIN
M
A
NU
AL
RF
AF
SQL
S
U
B
C
H
MULTI
B
C
M
AIN
G
AIN
VFO/CH
MENU
TF-
SET
MAIN SUB
SG.SEL
SCAN
M VFO
M.IN
RIT
CW TUNE
9.6k STA
RIT/SUB
CON
XIT
ALT
SET
CLEAR
P.C.T
_
+
HF/VHF/UHF ALL MODE MULTI BANDER TS-2000
S
A
T
L
A
/B
VFO/M
SPLIT
A=B
25
19
27
28 33
20
29
21
22
23
24 26
30
32
31
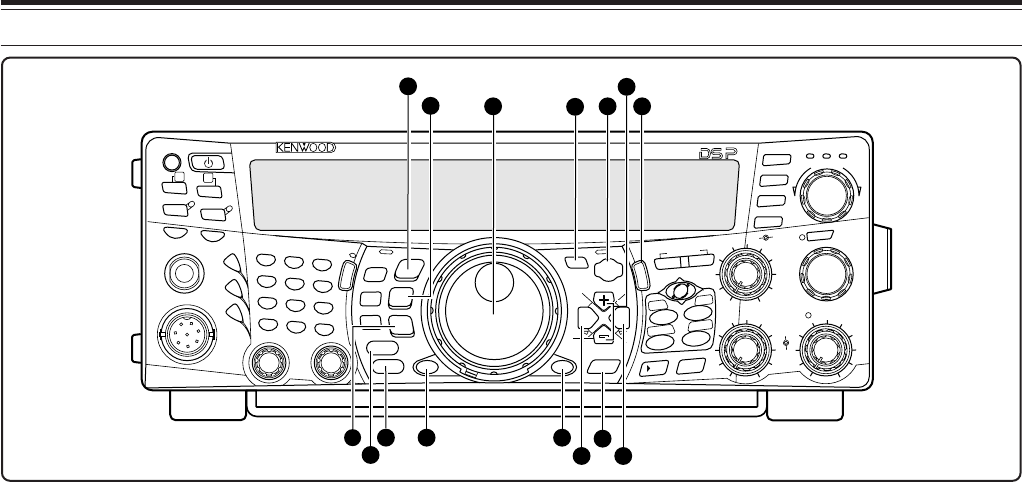
!9 LSB/ USB/ AUTO key
Press to select lower sideband (LSB) or upper
sideband (USB) mode for voice or digital operation.
Press [FUNC], [LSB/ USB/ AUTO] to toggle the auto
mode selection {page 73}.
@0 CW/ FSK/ REV key
Press to select CW or FSK (Frequency Shift Keying)
mode {pages 30, 51}. Press [FUNC],
[CW/ FSK/ REV] to reverse the sideband pitch.
@1 FM/ AM/ NAR key
Press to select FM or AM mode {pages 28, 29}.
Press [FUNC], [FM/ AM/ NAR] to select narrow
bandwidth transmission mode {page 29}.
@2 CLR key
Press to exit from, abort, or reset various functions.
Also used to erase memory channels {page 62} or
locking out memory channels from the scan list
{page 62}.
@3 DISP key
Press to toggle the normal operating mode and DSP
filter setting display mode {page 55}. Press and hold
to start the Visual Scan function {page 70}.
@4 1MHz/ SEL key
Press to switch the MHz Up/ Down function ON or
OFF using the MULTI/ CH control. Press [FUNC],
[1MHz/ SEL] to change the increment/ decrement
step value {page 37}. Press and hold to start the
MHz Scan function {page 68}.
@5 Tuning control
Turn to select the desired frequency {page 37}. Use
the convenient finger-tip cavity for continuous tuning.
The lever behind this control adjusts the control
torque level; turn fully clockwise for light torque or
fully counterclockwise for heavy torque.
@6 CTRL key
Press to toggle the operating controls between the
main transceiver and the sub-receiver. The
transmission band is not affected by this key.
@7 MENU key
Press to select or cancel the Menu mode that is used
for activating and configuring functions {page 21}.
@8 TF-SET key
While operating split-frequency, press to monitor or
change your transmit frequency {page 31}.
@9 +/ – (Up/ Down) keys
Press to step through all the Amateur radio bands
consecutively {page 18}. Also used to make
selections from the Menu {page 21}, and to check the
Start and End frequencies of the Scan function
{page 62}.
#0 MAIN key
Press to transfer the operating controls to the MAIN
transceiver. Also moves the transmission band to the
main transceiver frequency.
#1 SUB key
Press to transfer the operating controls to the sub-
receiver. Also moves the transmission band to the
sub-receiver frequency.
#2 SCAN/ SG.SEL key
Press to start or stop the Scan function {page 66}.
Press [FUNC], [SCAN/ SG.SEL] to select a scan
group {page 69}.
#3 CALL/ C.IN key
Press to recall a call channel for the selected operating
band (HF/ 50 MHz/ 144 MHz/ 430 (440) MHz/ 1.2 GHz
(TS-2000/ TS-B2000 Optional)). Press [FUNC],
[CALL/ C.IN] to write a new Call Channel to the
memory {page 75}.


