


8
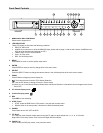
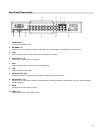
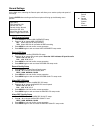
Front Panel Controls
1. REMOVABLE HDD CARTRIDGE
Please refer to Appendix #1.
2. LED INDICATORS
These LED Lights are ON under the following conditions:
• HDD Full: HDD is full
• ALARM: If you want to turn off the ALARM LED light, please refer to page 13 and set the Camera / ALARM item as
OFF (all of the cameras should be set as OFF.)
• TIMER: When Timer is set as Enabled
• PLAY: On Play mode
• REC: On Recording mode
3. MENU
Press MENU to enter or exit the system setup menu.
4. ENTER
Press ENTER to select an item for change while in the setup menu.
5. SELECT
Press the SELECT button to change the camera shown in the individual panes of the multi screen modes.
6. ZOOM
Press ZOOM to enlarge the picture display 2x.
7. This button has two functions: PIP & Motion Detection
(a) Press the PIP button to change to Picture in Picture mode.
(b) When you are in the Camera Channel Setup Menu and Motion Detection is activated it turns all targets on the screen
ON or OFF.
8. 4/7 channel display mode
9. 9 channel display mode
10. REC
Press REC to start recording.
11. STOP / Down
• STOP: Under the DVR Record / Play mode, it can stop the moment action.
• DOWN: When in the setup mode, it works as the Down directional button.
12. POWER
Press Power to turn ON / OFF the DVR.
13. FF / Right
FF: It can play video forward at high speed, and press FF again to adjust speed from 1, 2, 4, 8, 16, 32 times.
Right: When in the setup mode, it can work as the Right directional button.
14. PAUSE / Up
Pause: Under the DVR play mode, it can pause the action.
MENU ENTER
SELECT
ZOOM
1 23456
Right
Left
REC
Down
POWER
879
SLOW
Up
Digital Multiplex Recorder
AVC 776
1
3
6
4
7 8 9
2
5
10 11 12
1417
18
16 1315
MENU ENTER
SELECT
ZOOM
1 23456
Right
Left
REC
Down
POWER
879
SLOW
Up
Digital Multiplex Recorder
AVC 776
1
3
6
4
7 8 9
2
5
10 11 12
1417
18
16 1315