


5
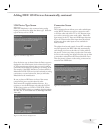
Device Selection Menu
This menu allows you to:
• Select the device for viewing on the display monitor.
• Select display monitor speakers or A/V Receiver
speakers for the audio.
• Change a NetCommand® compatible A/V Receiver’s
inputs automatically.
• Power NetCommand devices on or off.
• Verify NetCommand recordings and peer-to-peer
connections.
• Cancel recordings or peer-to-peer connections.
• Display the menu for HAVi devices.
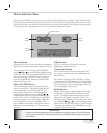
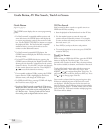
Transport Menu
This menu allows you to operate the transport functions of
NetCommand compatible IR controlled and IEEE
recording and playback devices.
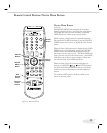
Record and Connect Buttons
The Record button on the remote control will allow you
to begin a recording or schedule a delayed recording using
NetCommand. The CONNECT button allows you to
establish a peer-to-peer connection between two IEEE
devices connected to the HDTV Receiver network.
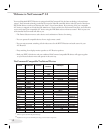
Note: To the left is a list of devices by several
manufacturers that have been tested and shown to be
compatible with the NetCommand control system.
When you use these devices you will be able to control
them without changing the setting of the remote control
from Cable/DBS/DTV to another product. Since
similar devices from the same manufacturer often operate
the same way, other models may be compatible, however
they have not been tested so not all NetCommand
functions may be available. For devices that are not
supported by NetCommand, you will need to use that
device’s original remote control or program the HDTV
Receiver remote to operate these devices in the traditional
manner.
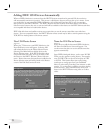
You need to program your HDTV Receiver
remote to operate the NetCommand features.
1. Move the slide switch at the top of the
Remote Control to the Cable/DBS/DTV
position.
2. Press and hold on the POWER button.
3. While holding on the POWER button,
enter the number for NetCommand 197.
4. Release the POWER button.
IMPORTANT
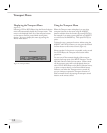
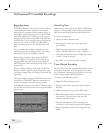
Track List
The Track List allows you to play, select or delete the
programs stored on your IEEE AV Disc.
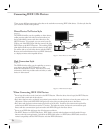
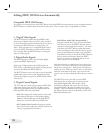
NetCommand® Setup
For NetCommand traditional devices, the NetCommand
Setup should have been completed. The NetCommand
Setup will detail what type and brand of devices are
connected and how these devices are connected to the
HDTV Receiver and A/V Receiver. In addition, you
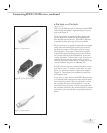
need to connect IR Emitters to the HDTV Receiver
connection labeled IR Output NetCommand. IR
Emitter ends should be properly placed in front of each
NetCommand IR device. You will need to make this
connection in order to control NetCommand IR devices.
The remote control needs to be programmed to operate
NetCommand functions. See the HD- Owner’s Guide
for instructions on connecting IR compatible devices, using
the NetCommand Setup and programming the remote
control.
Non-NetCommand IR Devices
When you are using a non-NetCommand compatible
device, select the device on the Device Selection menu and
press ENT(er). Then move the slide switch at the top of
your remote control to the appropriate layer and point the
remote control at the device to control it, or you will need
to use the remote control that came with that device.
Special Features