


42
43
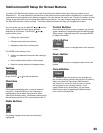
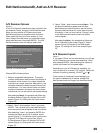
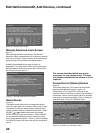
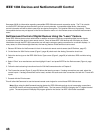
[Device] Screen
Figure 15
If you selected “None”, during initial setup, then you
can add a device. If you have added a new device, use
this screen to start learning.
Our examples show the choices for adding a VCR,
however, the same type of screens will appear for any
DBS (Direct Broadcast Satellite), DVD player or Cable
Box.
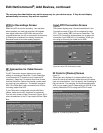
Edit NetCommand
®
Add Devices, continued
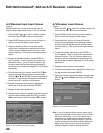
Choose ONE of these options:
1. Select a recognized manufacturer. The model
number optimized for NetCommand will display at
the bottom of the screen. If a number follows the
manufacturer’s name, (example: Mitsubishi 1), this
indicates additional models are optimized for that
manufacturer. For many device types, non-listed
models will operate in the same way as the listed
models and you can still use the pre-loaded setting.
After selecting Next>, the screens that follow are:
the Name Screen (Figure 18), Connection screen
(Figure 19) and specialized device screens (Figures
20-23), ending with the Finish screen (Figure 26).
2. Select “Other”, then highlight “Learn” and press
ENTER. This will allow you to have NetCommand
learn the remote control signals of this new device.
After selecting “Learn” and pressing ENTER, the
screens that follow are: [Device] Learn screen
(Figure 16), [Device] Advanced Learn screen (Figure
17), Name screen (Figure 18), Connection screen,
(Figure 19) and specialized device screens (Figures
20-23), ending with the Finish screen (Figure 26).
Figure 15. [Device] screen
3. Select “Other”, skip Learn and select Next>. This
will allow the device to appear and will allow
NetCommand to switch inputs to use this device.
However, NetCommand will not be able to control
this device. Later you may use the “Change” option
in the Setup menu to learn the remote control
signals.
After selecting Next>, the screens that follow are:
the Name Screen (Figure 18), Connection screen
(Figure 19) and specialized device screens (Figures
20-23), ending with the Finish screen (Figure 26).
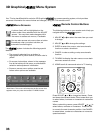
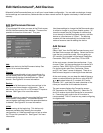
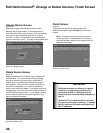
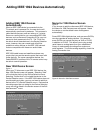
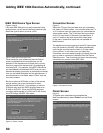
[Device] Learn Screen
Figure 16
Shown only if “Learn” was selected
1. Press ADJUST , , or to select the check
box for each function to be learned.
2. Press ENTER and the function name will begin to
flash to confirm the ready-to-learn status.
3. Press the button on the device’s remote control
that corresponds to the selected function. A check
mark will appear and the function name will stop
flashing. This confirms the signal learned status.
4. To test the learned command, press the ENTER
button on the TV remote, while the learned function
is still highlighted. The device should perform the
selected function. The device needs to be turned
on and the IR emitters properly placed for the
test to be successful (see page 27 for IR emitter
placement).
5. Repeat for each function to be learned.
6. To erase a learned function, highlight the check box
for that function and press CANCEL.
7. When the function signals have been learned,
press ADJUST to select Next> and move to the
[Device] Advanced Learn screen.
NOTE: When learning the device’s remote control
signals, point the device’s remote control at the
TV screen.
Hint: If the device’s remote control uses a single button
for both Power On and Power Off, don’t learn the
Power Off function.