


9
8
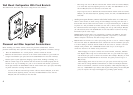
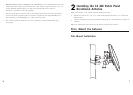
Now, Connect the Antenna
The instructions below cover outdoor and indoor installations.
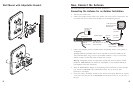
Connecting the Antenna for an Outdoor Installation
1. Turn off your wireless unit.
Wall Mount with Adjustable Bracket
2. Connect the provided 2-meter cable to the antenna and to the arrestor as shown here. You
can connect the cable to either of the two RF ports on the lightning arrestor.
3. Connect the grounding cable (not included) from the lightning arrestor to the ground of
the building.
Grounding cable: The grounding cable must be equivalent or better than: AWG 10, UL
1015, Stranded, 600 V, 105 C, green or green/yellow insulation, 2 clip of 5.5 mm inner
diameter cramped at both ends, cable no longer than 5 meters.
4. Screw the N/SMA Reverse Adapter on the lightning arrestor (clockwise) on the second RF
port. Connect a NETGEAR cable model ACC-10314-01, 02, 03, 04 or 05 (sold
separately) to the adapter.
5. Locate the primary detachable antenna on the wireless access point. Remove the antenna
and connect the other end of the NETGEAR cable ACC-10314-01, 02, 03, 04 or 05 to
this port.
Warning: the lightning arrestor and appropriate ground cable must be used for outdoor
installation. NETGEAR does not assume any responsibility in case of hazard resulting of
non-compliance with these instructions.
Wireless unit
Ethernet
(CAT 5) cable
2m cable
(provided)
N/SMA adapter
14 dBi Patch Panel
Directional Antenna
ANT24D18v2
Wireless unit's
DC block
45cm cable
(provided)
Lightning
arrestor
NETGEAR cable
ACC-10314-01, 02, 03, 04, 05
(Sold separately)
Ground cable
(Not provided)
Building
grounding