10
Index to Parts and Controls
For operational instructions, see the page indicated in brackets [ ].
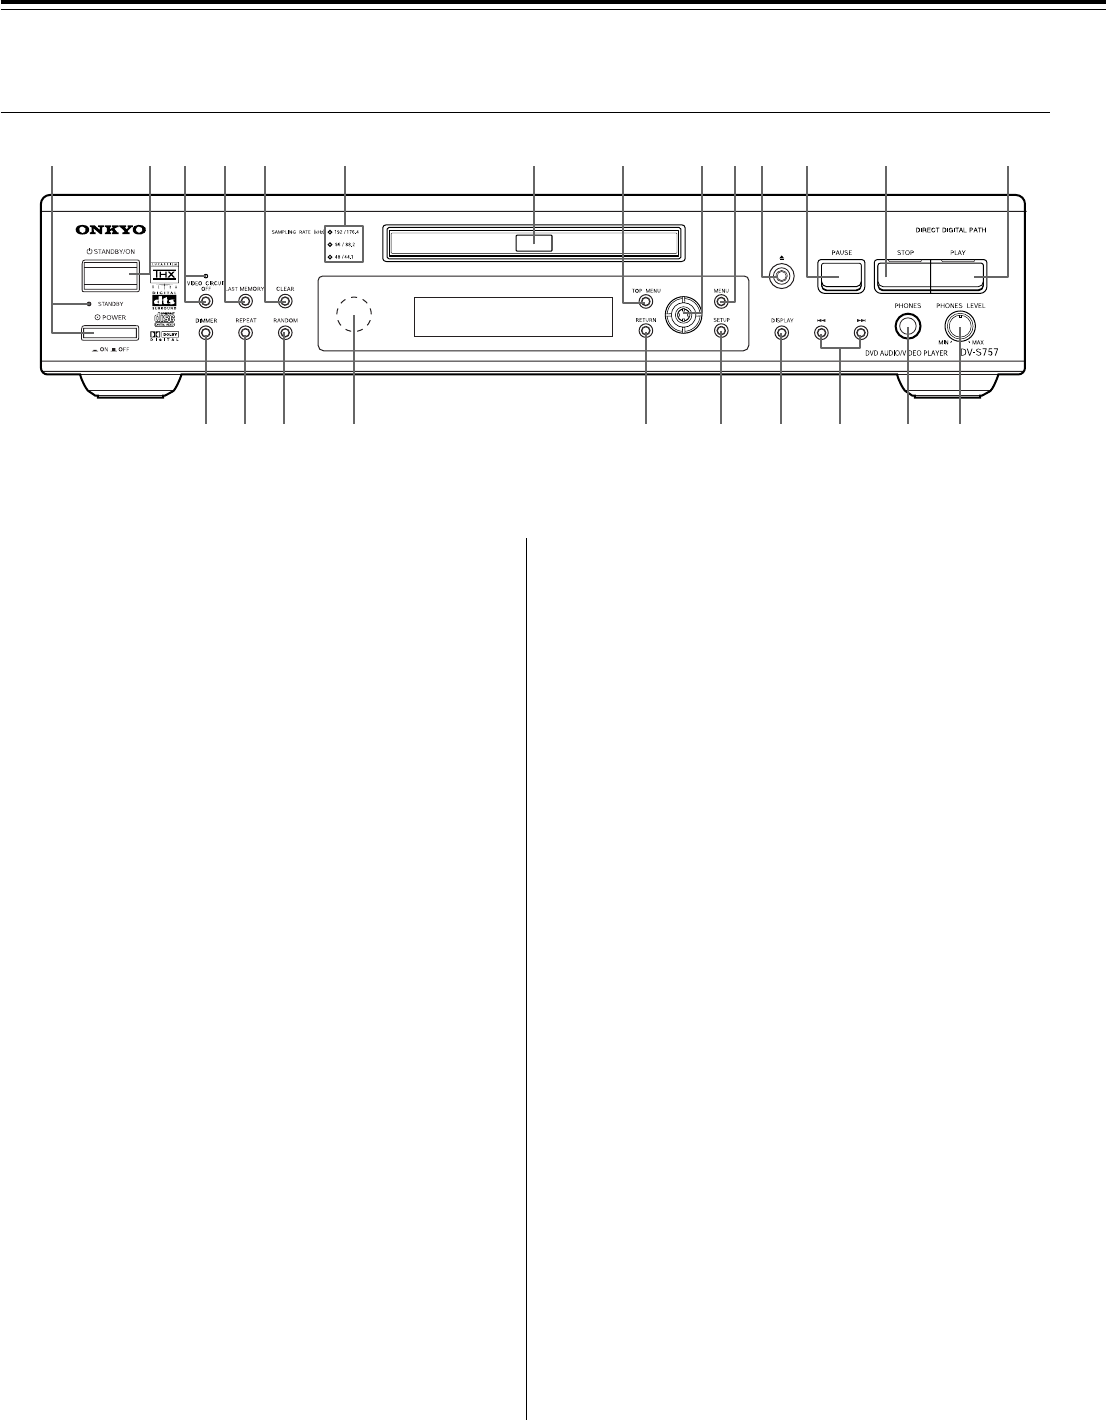
■ Front panel
1245
#
3
@$
%^&*) _
7890-=~ !
6
(
1 POWER switch and STANDBY indicator [16]
Turns on the main power supply for the DV-S757. The DV-S757
enters standby state and the STANDBY indicator lights up.
Pressing the switch again to the off position (— OFF) shuts down
the main power supply into the DV-S757.
• Before turning on the power, make sure all cables are properly
connected.
2 STANDBY/ON button [16, 17, 21, 24, 42, 60]
When STANDBY/ON button is pressed to ON while the POWER
switch is set to ON, the DV-S757 turns on and the STANDBY
indicator turns off. The indicator around 0 button lights up.
Pressing the button again returns the DV-S757 to the standby
state. This state turns off the display, disables control functions.
3 VIDEO CIRCUIT OFF button and indicator [38]
Press to switch the video signal off.
4 LAST MEMORY button [36]
You can resume DVD or Video CD playback from the point you
last watched even if the disc is removed from the player. Press
LAST MEMORY during playback to set a Last Memory point.
When you want to resume playback of that disc, press LAST
MEMORY in the stop mode and playback starts from the
memorized point. Last Memory locations can be stored for up to 5
DVDs and 1 Video CD.
5 CLEAR button [27-32, 35-37, 55]
Works in conjunction with a number of player functions. Use to
cancel repeat and random playback, and to edit programs.
6 SAMPLING RATE indicator [21]
When playing a disc, the appropreate SAMPLING RATE indicator
lights up.
7 Disc tray [21]
When loading a disc, place discs in the disc tray with the label
side facing up.
8 TOP MENU button [22, 26]
Press to call up the top menu programmed on the DVD.
Depending on the DVD, the top menu may be identical to the
DVD menu.
9 Cursor (2/3/5/∞) button/ENTER button
[17, 21, 22, 27, 29-33, 41, 42, 50, 51, 55, 57, 58, 60]
Use 2/3/5/∞ to move through the options on menu screens and
to change settings. Use ENTER to implement settings selected
with the cursor buttons or to set items highlighted in a menu.
0 MENU button [22, 27, 34, 35, 54]
Use to display or close the DVD menu or MP3 Navigator screen.
- 0 button [21, 24]
Press to open and close the disc tray.
= 8 PAUSE button [25, 30]
Press during playback to pause. Press again to resume playback.
~ 7 STOP button [17, 22, 24, 30, 32, 36]
Press to stop playback. Pressing once enables playback to
resume from a point shortly before the location where it stopped.
Pressing twice causes the disc to return to the beginning of the
disc if playback starts again. Whenever a disc is loaded in the
player, indicator above 7 STOP lights up.
! £ PLAY button [21, 23-26, 28-30, 32, 36]
Press to start or resume playback. Whenever a disc is loaded in
the player, indicator above £ PLAY lights up.
@ DIMMER button [41]
Toggle to control the lightness of the display (3 steps).
# REPEAT button [28]
Use to set the repeat mode.
$ RANDOM button [29]
Press to play chapters/tracks in random order.
% Remote control sensor [9]
Point the remote control toward the remote sensor to operate the
player.
^ RETURN button [22, 42, 55, 58]
Use to go one menu back (current settings are maintained). Use
RETURN when you do not want to change the option setting in a
menu.
& SETUP button [17, 42, 60]
Press when the player is in either play or stop mode to open and
close the Setup screen.
* DISPLAY button [40, 41, 51]
Press during playback to display statistical disc information.
Press repeatedly to display different information.
( 4/¢ button [22, 23]
Press to go back or advance to previous chapters/tracks. Press
and hold to perform fast-reverse/fast-forward playback scanning.
) PHONES jack [39]
This is a standard stereo jack for connecting stereo headphones.
The audio for the ANALOG OUTPUT CH 1 and CH 2 are sent to
the headphone speakers.
_ PHONES LEVEL dial [39]
Use to control the phones level. Turn the dial clockwise to
increase the phones level and counterclockwise to decrease it.


