


23
Viewing 3D images
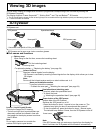
You can enjoy viewing 3D images with contents or programmes corresponding to the 3D effect by wearing the
3D Eyewear (supplied).
This display supports “Frame Sequential*
1
”, “Side by Side*
2
” and “Top and Bottom*
3
” 3D formats.
*
1:
The 3D format that the images for the left and right eyes are recorded with the high defi nition quality and alternately played back
*
2,
*
3: Other available 3D formats
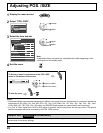
3D Eyewear set
3D Eyewear Specialised band
Nose pad A Nose pad B 3D Eyewear case
• Use either nose pad A or B for your preference.
• 3D Eyewear can be worn over vision correction glasses.
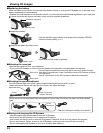
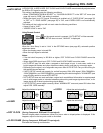
Part names and functions■
3D Eyewear
Infrared receiver
Receives infrared signals from the display.
•
3D Eyewear is controlled by receiving infrared signals from the display, which allows you to view
3D images.
Note:
Do not soil the infrared receiver section or attach stickers etc. to it.
Battery cover
When using for the fi rst time, remove the insulating sheet.
Insulating sheet
Pull the insulating sheet
• To replace the battery
“Replacing the battery” (see page 24)
Specialised band attaching parts
If required, attach the specialised band.
• To attach the band
“Attaching the specialised band” (see page 24)
Lenses - Liquid Crystal Shutter
Controls the images for 3D viewing.
• The left and right liquid crystal shutters are
alternately opened and closed in time with
the images on the display screen to achieve
the 3D effect.
Note:
Do not apply pressure to or scratch the
surface of the liquid crystal shutter.
Power button of the 3D Eyewear
(bottom side of the 3D Eyewear)
Switches the 3D Eyewear on or off.
• Press the button for about 1 second to turn the power on. The
indicator lamp lights for about 2 seconds and then goes off.
• To turn the power off, press the button for about 1 second again.
The indicator lamp fl ashes 3 times, then the 3D Eyewear turns off.
Note:
If the 3D Eyewear does not receive any signals from the display for
about 5 minutes, the 3D Eyewear will be turned off automatically.
Nose pad installation section
If required, attach the nose pad.
• To attach the nose pad “Attaching the nose pad” (see page 24)
Power button
Indicator lamp