


35
Advanced Operations
Operations
1 Press the Pause/Still button e on this VCR and then use
the Shuttle Ring f or Jog Dial g to search for the tape
position from which you want to start recording.
2 Press the REC/OTR button d on this VCR to put it in the
recording pause mode.
3 Put the source unit in the still playback mode at the point
from which you want to start dubbing (copying) onto this
VCR.
4 Press the Pause/Still button e on this VCR to start
recording.
≥ Playback on the source unit starts automatically at the
same time.
5 When you reach the point where you want to finish
recording, press the Pause/Still button e on this VCR
again.
≥ This VCR is now in the recording pause mode and the
source unit in the still playback mode.
≥ To record another scene, repeat operation steps 3 to
5.
6 Press the Stop button 9 on this VCR and on the source
unit to finish editing.
Hint:
≥ If you want to change the audio recording level, adjust it.
(See page 20.)
Synchronized Editing
This function makes editing onto this VCR from a video movie
camera or another VCR equipped with a synchro edit socket
very easy and precise. Playback start (or stop) on the
playback (source) unit is automatically activated when you
start (or stop) recording on this VCR.
Preparations
≥ Press the MENU button U and then use the Cursor buttons
(LMFE) R to select “Edit”, and then set it to “OFF”.
(See page 54.)
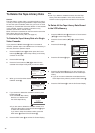
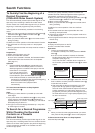
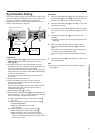
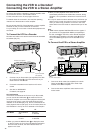
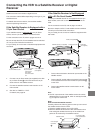
≥ Connect this VCR to a video movie camera or a VCR
equipped with a synchro edit socket using an AV cable or a
21-pin Scart cable, as shown in the illustration.
Also, connect the video movie camera or VCR to this VCR
using the Synchro Connection Cable (VW-K10E/VW-K1E),
as shown in the illustration.
For details, also read the operating instructions of the
source unit.
≥ Display the VCR picture on the TV.
≥ Insert the cassette onto which you want to perform
synchronized editing and make sure that its erasure
prevention tab is intact.
As soon as the cassette is inserted, the Cassette Number
Check starts. Wait a few moments until this check is
completed. (See page 15.)
≥ Set the VCR/TV switch P to “VCR”.
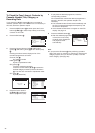
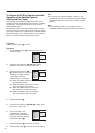
≥ Press the INPUT SELECT button 3 to select the AV input
(external input) “A1”, “A2” or “A3” according to the socket(s)
to which you have connected the source unit.
A1: When connected to the AV1 21-pin Scart socket k
[AV1 (TV)]
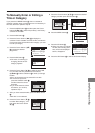
A2: When connected to the AV2 21-pin Scart socket l
[AV2 (DECODER/EXT)]
≥ Make sure that “AV2” is set to “EXT”.
(See page 53).
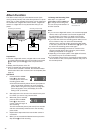
A3: When connected to the Video Input socket ]
[VIDEO IN (AV3)] and Audio Input sockets ^
[AUDIO IN (AV3)] on the front panel of this VCR
≥ When connecting a mono type movie camera or
VCR to this VCR’s front AV sockets, connect to the L
(white) audio socket.
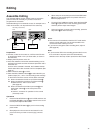
Recording unit (this VCR)
j
k
Video movie
camera
Synchro Connection
cable
(not supplied)
Other VCR
Front
Rear
l
]
^