


4
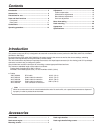
This remote control unit (RCU) is designed to be used with a convertible camera (such as the AW-E860, AW-E750, AW-E650,
AW-E655 or AW-E350).
By connecting the RCU cable (AW-CA50A26), the power supply to the camera as well as the camera settings, switching
operations and adjustments can be performed by remote control.
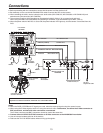
The unit comes with a tally/intercom input/output connector, AUX input/output connector (for line viewing) and G/L input/output
connector to make it easy to configure a system.
Also provided are controller connectors for controlling a contact-type pan/tilt head and lens.
The maximum extendible length of the cables is as follows:
Camera body (including lens): 984 ft. (300 m)
AW-E860 + AW-PB305 (studio card) + 5-inch viewfinder:
328 ft. (100 m)
Cables
AW-CA50A26 RCU cable 49.2 ft. (15 m)
WV-CA26U15 Studio cable for extension
49.2 ft. (15 m)
WV-CA26U30 Studio cable for extension
98.4 ft. (30 m)
WV-CA26U100 Studio cable for extension
328 ft. (100 m)
WV-CA26T26 Joint connector for extension
Introduction .......................................................................
4
Accessories ...................................................................... 4
Precautions for use ..........................................................
5
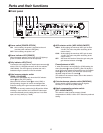
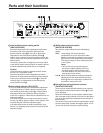
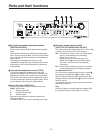
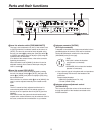
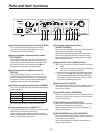
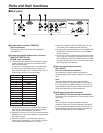
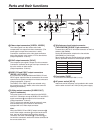
Parts and their functions .................................................
6
Front panel ......................................................................
6
Rear panel .....................................................................
11
Connections .................................................................... 13
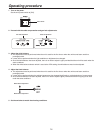
Operating procedure ......................................................
14
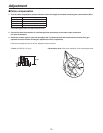
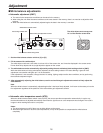
Adjustment ...................................................................... 15
Cable compensation .....................................................
15
White balance adjustments ...........................................
16
Black balance adjustments ...........................................
17
Gen-lock adjustment .....................................................
18
Menu item setting ...........................................................
19
Rack mounting ................................................................
20
Appearance ..................................................................... 21
Specifications ................................................................. 22
Power cable ......................................................................
1
Rack-mount angles .........................................................
2
Mounting screws .............................................................
4
Rack angle handles .........................................................
2
Rack angle handle fixing screws ...................................
4
Contents
Introduction
Accessories
Note
When the remote control unit is to be discarded at the end of its service life, ask a specialized contractor to dispose of
it properly in order to protect the environment.