


- 23 -
TC-20G12P / TC-29G12P / TC-29G12PU
Service Adjustments and Calibrations
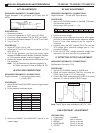
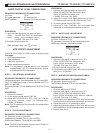
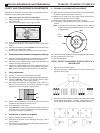
STEP 2 - HORIZONTAL WIDE ADJUSTMENT
PROCEDURE:
1. Apply a MONOSCOPE pattern.
2. Adjust the horizontal register center (DAC: Cc) until the
correctly image centralization.
3. Check if the horizontal wide is 2.25±0.25, according
showed below.
To TC-29G12P and TC-29G12PU only:
4. Confirm that the horizontal width is in normal range.
5. Adjust E-W Pincushion to correct the horizontal width.
STEP 3 V-HEIGTH ADJUSTMENT
PROCEDURE:
1. Apply a PHILIPS pattern.
2. Adjust CONTRAST on maximum, and BRIGHT on
center.
3. Adjust (DAC: B5) to the correct vertical size doing that
the PHILIPS pattern get a circle form.
4. Apply a PHILIPS pattern.
5. Check if exist Raster Slacking on the display.
STEP 4 V-CENTER ADJUSTMENT
PROCEDURE:
1. Apply a PHILIPS pattern.
2. Adjust CONTRAST on maximum, and BRIGHT on
center.
3. Adjust the vertical center (DAC:B6) to center PHILIPS
pattern on the CRT.
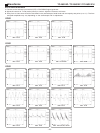
CRT CUT OFF ADJUSTMENT
REQUIRED EQUIPMENTS / CONNECTIONS:
Oscilloscope: Between GK and GND (CRT Board).
PREPARATION:
1. The TV must be turn ON minimum 15 minutes before
adjustment.
2. Apply a White Balance pattern.
3. Adjust the image mode to DYNAMIC.
4. Adjust COLOR and CONTRAST to NORMAL.
5. Enter in the service mode.
6. Adjust CUT OFF and DRIVE DATA to:
C0: CUT OFF _R=0_ 64
C1: CUT OFF _G=0_ 128
C2: CUT OFF _B=0_ 64
C3: DRIVER_R=64
C4: DRIVER_B=64
7. Adjust SCREEN VR to minimum.
8. Connect the Oscilloscope.
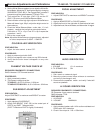
PROCEDURE:
1. On service mode, press R-TUNE on remote control to
enter to horizontal line mode.
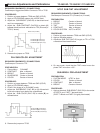
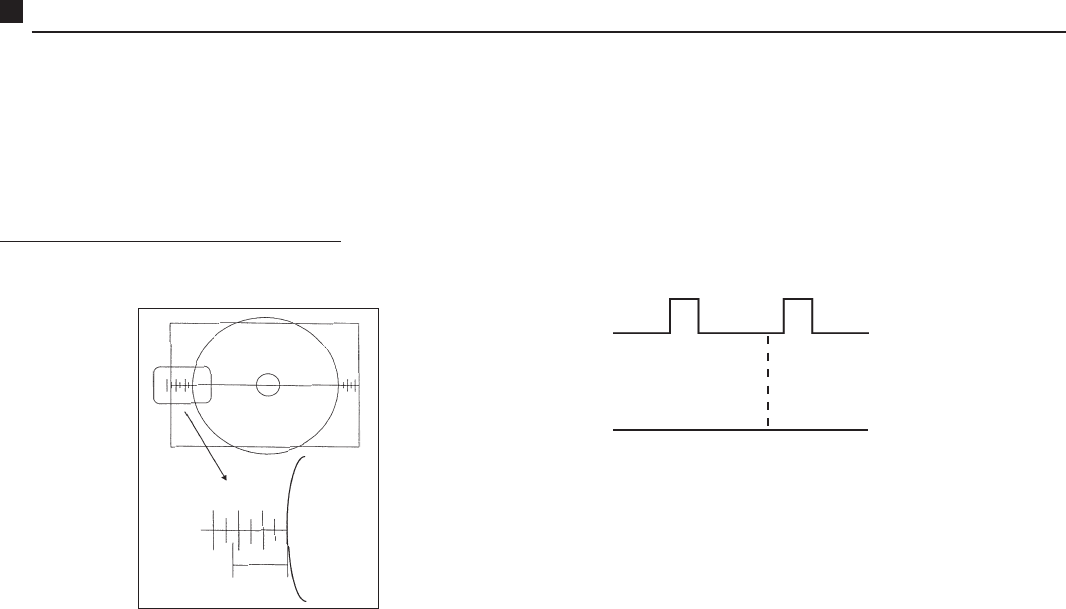
2. See (GK) on the oscilloscope screen, then adjust SUB-
BRIGTH (DAC: B2) to raster period be as showed below.
3. Adjust SCREEN VR to the first line stayed lightly lighted.
Note: After adjusted, SCREEN VR doesnt must be altered.
4. Adjust CUT OFF to the horizontal line become white.
(R, B CUT OFF )( DAC: C0)(DAC: C2).
5. Press R-TUNE again to exit of horizontal line mode.
6. Get the correct White Balance altering the RED drive
(DAC: C3),and BLUE drive (DAC: C4).
7. Apply a PHILIPS pattern.
8. Get a normal image adjusting the CONTRAST, BRIGHT
and FOCUS VOLUME. Then check the image havent
convergence loss.
WHITE BALANCE ADJUSTMENT
Note: The CRT CUT OFF adjust must be done before that
White Balance adjust.
EQUIPMENTS:
White Balance Meter and Helm Holts Device.
PREPARATION:
1. The TV must be turn ON minimum 30 minutes before
adjustment.
2. Check have done the CUT OFF adjust before.
3. Helm Holts Device must be adjusted to the local magnetic
field.
4. Apply a White Balance pattern.
5. Set PICTURE MODE to DYNAMIC.
6. Adjust CONTRAST to maximum and COLOR to normal.
7. DEGAUSS on the CRT screen.
8. Install the White Balance Meter on the CRT screen.
9. Be sure that there are not other light source in the
ambient.
10.Enter on the Service Mode.
PROCEDURE:
1. Set standard window to under side White Balance Meter.
Adjust the low light of G to 50µ A, using SUB-BRIGTH
(DAC: B2).
2. Then ,adjust the low light of R (DAC: C0) and the B
(DAC: C2), to zero on the White Balance Meter.
3 2 1
2.25±0.25
GK waveform
TC-20G12P = 160VDC
TC-29A12P = 195VDC
TC-29G12PU = 195VDC