


-10-
1
+
–
SCSI ID
TERMINATION
ON
OFF
1 2 3 4
MODE
ON
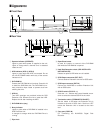
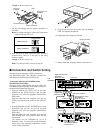
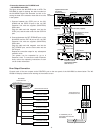
Switch Settings
1. Set MODE switch #2 on the rear of the WJ-HD500 to
ON when connecting a DVD Extension Unit with an
optional HDD.
2. Set the SCSI ID for the DVD Extension Unit and
each subsequent Extension Unit with the – or +
selector on the rear of each Unit.
0 to 5: IDs for Extension Units.
Note: SCSI ID 6 and 7 are reserved for WJ-HD500
Digital Disk Recorder.
3. Set the termination switch to ON for the Extension
Unit located at the end of the SCSI chain.
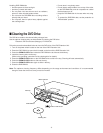
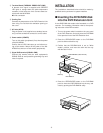
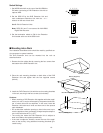
■ Mounting into a Rack
The installation described below should be made by qualified ser-
vice personnel or system installers.
The DVD Extension Unit can be mounted into the rack as
described below.
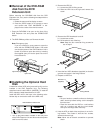
1. Remove the four rubber feet by removing the four screws from
the bottom of the DVD Extension Unit.
2. Place the rack mounting brackets on both sides of the DVD
Extension Unit and tighten with the four supplied screws
(M4x10).
3. Install the DVD Extension Unit with the rack mounting brackets
in the rack, securing it with four screws (not included).
Cautions:
• When mounting a DVD Extension Unit together with other appli-
ances in a rack, it may be influenced by the power transformer,
etc. of some units such as amplifiers. In this case, install the
Extension Unit below such units and leave one or two spaces
open inbetween.
• Do not block the ventilation opening or slots in the cover to pre-
vent the appliance from overheating. Always keep the tempera-
ture in the rack below 45˚C (113˚F).
• The cooling fan inside the DVD Extension Unit is subject to
wear and needs to be replaced periodically.
• If the rack is subject to vibration, secure the rear of the appli-
ance to the rack by using additional mounting brackets (pro-
cured locally).
Remove 4 screws
M3X10 (Supplied)
Rack Mounting Bracket (Supplied)
M5X12 (Not supplied)