


4 C2647M-B (10/09)
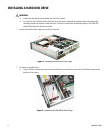
Installing the Hard Disk Drive Replacement Kit
GETTING STARTED
1. Familiarize yourself with the instructions in this document.
2. Verify that you have all the necessary parts and tools (refer to Parts and Tools on page 3).
3. If possible, export all essential video before you install a new hard disk drive. If your unit contains two hard disk
drives, export all essential video on both drives. Follow the instructions for exporting video in the DVR5100 Hybrid
Video Recorder Operation manual.
PREPARING THE UNIT
1. Shut down the DVR5100 unit as follows. If you are already logged on, use the on-screen menus to log off and
proceed with the following steps. For security purposes, the unit can only be shut down with Administrator-level
permissions.
a. From the Login screen, select the administrator user ID, and then enter the appropriate administrative
password.
b. Select Shut Down to power off the system. The DVR5100 saves all configuration information and recorded video
and then shuts down.
2. Remove the power cord from the back of the DVR5100.
3. Disconnect any cables or connections that may restrict access or interfere with the removal of the unit.
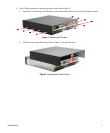
4. If mounted in a rack, unscrew the fasteners that secure the unit in the rack, and then carefully slide the unit out of the
rack. Two people may be required for this step.
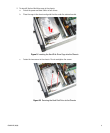
5. Place the DVR5100 on a flat surface with ample workspace. Make sure the area provides full access to the DVR5100
internal components.
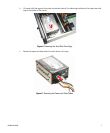
WARNINGS:
• Make sure the unit is turned off and you are wearing a properly grounded ESD wrist strap before attempting to
open the chassis cover.
• The chassis assembly includes parts with sharp edges. To avoid injury, use caution when working in and around
the DVR5100 chassis and components.