


C4632M (11/09) 67
DATE AND TIME SETUP
The date and time feature has the following guidelines:
• NTP: Synchronizes the unit's time with the Network Time Protocol (NTP) server.
• Date/Time: The date and time displayed in the Client window is based on the date and time settings derived from and configured on the
client computer. The server date and time cannot be configured from the Client application. Refer to the DX4104 Server Operation/
Configuration manual for more information.
• Date Format: Allows you to select the date and time format. Refer to DX4104 Server Operation/Configuration manual for more
information.
NOTE: When the date format is changed at the Client application, it becomes effective at the server after you enter and exit the server’s
Setup menu.
• Time Zone: Displays the time zone configured on the DX4104.
• Server: Allows you to select a private or public server. For the public server, the DVR obtains the average time from five public servers
(rime.nist.gov, time-a.nist.gov, timeb.nist.gov, ntp.nasa.gov, and clock.isc.org).
• Private Time Server: Allows you to enter the NTP server IP address or host name. Supports up to 24 characters including 0.0.0.0 to
255.255.255.255, a to z, A to Z, numerals 0 to 9, and special characters.
• Sync. Interval: Allows you to select how often the DVR’s time is synchronized with the NTP server.
• Daylight Saving: Enables or disables daylight saving operation. You must configure DST on both the DX4104 and the computer on which
the remote Client application is running.
– Start: Sets the start time. The effective time is 2:00 a.m.
– End: Sets the end time. The effective time is 2:00 a.m.
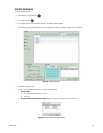
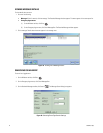
To configure the date and time settings:
1. On the toolbar, click the Setup icon .
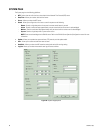
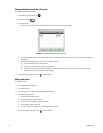
2. Click the System icon . The System page appears.
3. In the Date/Time section:
a. (Optional) select the NTP check box.
b. In the Date Format box, select the date format.
NOTE: The time zone setting is displayed but is unavailable. This setting must be configured on the DX4104 server. Refer to the
DX4104 Server Operation/Configuration manual for more information.
c. In the Server box, perform one of the following options:
• Accept the default server setting: Go to step 3d.
• Enter a private time server: In the Private Time Server box, type the server’s IP address or host name.
d. In the Sync. Interval box, select an interval.
e. (Optional) Select the DST start and end dates.
4. To save the changes, click the Live icon , and then click OK.