


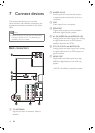

14
View photos, play music and
watch video from a USB
storage device
Your TV is À tted with a USB connector that
enables you to view photos, listen to music or
watch movies stored on a USB storage device.
Supported À le formats
Pictures JPEG (non-
progressive only)
Music MP3
Video MP4, M4V
Note
Philips is not responsible if the USB storage
device is not supported nor is it responsible
for damage or loss of data from the device.
Only FAT or DOS-formatted USB storage
devices are supported. File names must not
exceed 128 characters.
Your TV only supports USB Á ash drives in
FAT/FAT32 format. It does not support other
devices that can be connected to the USB
port including but not limited to the following:
portable storage devices such as external
hard drives and mini hard drives, MP3 player,
digital camera, phone, portable video player,
portable multimedia player.
The capacity of the USB storage device must
not exceed 32 gigabytes.
The À le size of all supported formats must not
exceed 4 gigabytes.
•
•
•
•
•
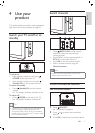
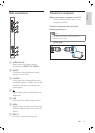
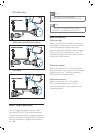
1 Connect a USB storage device to the
USB port on the side of the TV.
2 Select [Browse USB] .
3 Press to navigate through the
folder hierarchy on the USB storage
device.
4 Select a À le and press OK .
5 Use , , , or to control play.
Note
Press OPTIONS to display options for
viewing photos, playing music, and watching
videos.
•
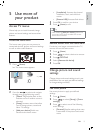
Use the TV clock
You can display a clock on the TV screen. The
clock displays the current time using time data
received from your TV service operator.
When watching TV, press CLOCK .
The clock is displayed.
Change the clock mode
1 Press ( Home ).
2 Press to select [Installation] >
[Clock] > [Auto clock mode] .
3 Select [Automatic] or [Manual] .
Change the time zone
1 Press ( Home ).
2 Press to select [Installation] >
[Clock] > [Time zone] .
3 Select an increment value.
Set the date
1 Press ( Home ).
2 Press to select [Installation] >
[Clock] > [Date] .
3 Use the numeric buttons to enter the
date.
4 Select [Done] .
5 Press OK .
Set the time
1 Press ( Home ).
2 Press to select [Installation] >
[Clock] > [Time] .
3 Use the numeric buttons to enter the
date.
4 Select [Done] .
5 Press OK .
»
EN