


10 Hookups (cont’d)
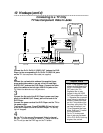
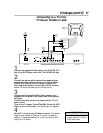
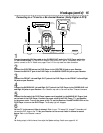
Connecting to a TV Only
TV has Component Video In Jacks
MAINS
SURROUND
MULTICHANNEL AUDIO OUT
SUB WF FRONT
AUDIO
OUT
CVBS P
r
/C
r
P
b/
C
b
VIDEO OUT
Y S-VIDEO
OPTICALCOAXIAL
P
r
/C
r
P
b/
C
b
Y
PROGRESSIVE SCAN OUT
DIGITAL AUDIO OUT
PCM/MPEG2/AC-3/DTS
SURROUND
CENTER FRONT
R
L
R
L
2
1
Back of TV
(example only)
LEFT AUDIO IN
RIGHT AUDIO IN
Pr/Cr
Y
Pb/Cb
LEFT AUDIO IN
RIGHT AUDIO IN
Cr/R-Y
Y
Cb/B-Y
Unused
Yellow
Plug
Unused
Yellow
Plug
1
Connect the Pr/Cr Pb/Cb Y VIDEO OUT jacks on the DVD
Player to the corresponding Pr/Cr Pb/Cb Y VIDEO IN jacks
on the TV. Use component video cable (not supplied).
2
Connect the red and white cables of the supplied three-
prong audio/video cable to one set of the Left and Right
AUDIO OUT jacks on the DVD Player. Connect the other
end of the cables to the left/right AUDIO IN jacks on the
TV. Match the cable colors to the jack colors.
3
Connect the flat end of the DVD Player’s power cord (sup-
plied) to the MAINS (AC Power) jack on the back of the
DVD Player.
Connect the power cords of the DVD Player and the TV to
the power outlet.
Turn on the TV power. Press STANDBY-ON on the front
of the DVD Player to turn on the DVD Player. The Standby
light will disappear.
4
Set the TV to the correct Component Video In channel.
See your TV owner’s manual for details. Or, change channels at
the TV until you see the DVD logo on the TV screen.
1
2
3
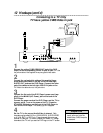
•
If your TV has Progressive Scan,
connect the DVD Player’s Pr/Cr
Pb/Cb Y PROGRESSIVE SCAN
OUT jacks to the TV’s
Progressive Scan In jacks
(instead of using the VIDEO
OUT jacks as described in step
1). Progressive Scan produces a
clearer picture by doubling the
number of visible picture lines
per field. This provides a jitter-
free, sharp, quiet picture. Only
use these connections if your
TV has Progressive Scan capa-
bilities. Check your TV manual
for more information.
• On the TV, the component
video in jacks may be labeled
YUV or Pr/Cr Pb/Cb Y and may
be green, blue, and red.
Helpful Hints