


1514
Setup, cont.Setup, cont.
Setting any Mode to use its own Volume/Mute Control
(MODE VOL. SET)
This sets any Mode to use only its own Volume/Mute
control, i.e. Volume/Mute punch-through is disabled for
this Mode. Note - If your chosen Mode has no Volume/
Mute functions of its own then the Volume/Mute buttons
will do nothing.
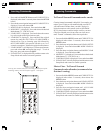
1. Press and hold the SETUP button until CODE SETUP
is displayed (takes about 3 seconds), then release the
SETUP button.
2. Press the down navigation button until SYSTEM
SETUP is displayed.
3. Press and release OK. VOL/MUTE SETUP is
displayed.
4. Press and release OK. ALL VOL. SET is displayed.
5. Press the down navigation button until MODE VOL.
SET is displayed
6. Press and release OK. MODE VOL. SET? is displayed.
7. Press and release OK. MODE VOL. MODE? is
displayed.
8. Press and release desired Mode key (TV, VCR, DVD,
etc.) to be disabled for Volume/Mute punch-through
control. PLEASE WAIT is briefly displayed, followed
by SUCCESS and the remote returns to normal
operation.
The chosen Mode will now use its own Volume/Mute control.
Resetting Volume/Mute Control to Factory Defaults
(VOL/MUTE RESET)
This resets Volume/Mute control back to its Factory
default settings.
1. Press and hold the SETUP button until CODE SETUP
is displayed (takes about 3 seconds), then release the
SETUP button.
2. Press the down navigation button until SYSTEM
SETUP is displayed.
3. Press and release OK. VOL/MUTE SETUP is
displayed.
4. Press and release OK. ALL VOL. SET is displayed.
5. Press the down navigation button until VOL/MUTE
RESET is displayed
6. Press and release OK. CONFIRM RESET is displayed.
7. Press and release OK. PLEASE WAIT is briefly
displayed, followed by SUCCESS and the remote
returns to normal operation.
Volume/Mute control is now rest to its Factory default
settings.
Setting the Time of Day (TIME SETUP)
To set the Time of day for normal LCD time display.
1. Press and hold the SETUP button until CODE SETUP is
displayed (takes about 3 seconds), then release the
SETUP button.
2. Press the down navigation button until SYSTEM
SETUP is displayed.
3. Press and release OK. VOL/MUTE SETUP is displayed.
4. Press the down navigation button until TIME SETUP is
displayed.
5. Press and release OK. TIME? is displayed showing
current format (12 or 24 hour) flashing and current time.
6. Use the Up/Down navigation buttons to set the format
(12Hr or 24Hr) then press and release OK.
7. The “hours” will be flashing. Use the Up/Down buttons
to set the hours then press and release OK.
8. The “minutes” will be flashing. Use the Up/Down buttons
to set the minutes then press and release OK.
9. SUCCESS is displayed. The remote remains in Setup
Mode, returning to the CODE SETUP screen. Press QUIT
then OK to exit Setup Mode.
Setting the Date (DATE SETUP)
To set the Month, Date and Day.
1. Press and hold the SETUP button until CODE SETUP is
displayed (takes about 3 seconds), then release the SETUP
button.
2. Press the down navigation button until SYSTEM SETUP
is displayed.
3. Press and release OK.
4. Press the down navigation button until DATE SETUP is
displayed.
5. Press and release OK. YEAR? is displayed with the last 2
year digits flashing.
6. Use the Up/Down buttons to set the Year then press and
release OK.
7. MONTH? is displayed with the Month digits flashing.
Use the Up/Down buttons to set the Month then press
and release OK.
8. DATE? is displayed with the Date digits flashing. Use
the Up/Down buttons to set the Date then press and
release OK.
9. DAY? is displayed with the Day flashing. Use the Up/
Down buttons to set the Day then press and release OK.
10. SUCCESS is displayed and the remote remains in Setup
Mode, returning to the CODE SETUP screen. Press QUIT
then OK to exit Setup Mode.