


Recording
06
51
En
6 Press ENTER to set the end time.
7 Select ‘Yes’ to set the timer recording and exit, or
‘No’ to go back to the timer recording screen.
• You can check the timer recording details you just set
from the main timer recording screen (see
Standard
timer recording
below).
Note
• You can’t use VPS/PDC with Easy Timer Recording.
Use the standard or VIDEO Plus+ timer recording
methods if you want to use VPS/PDC.
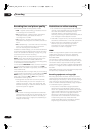
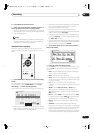
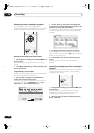
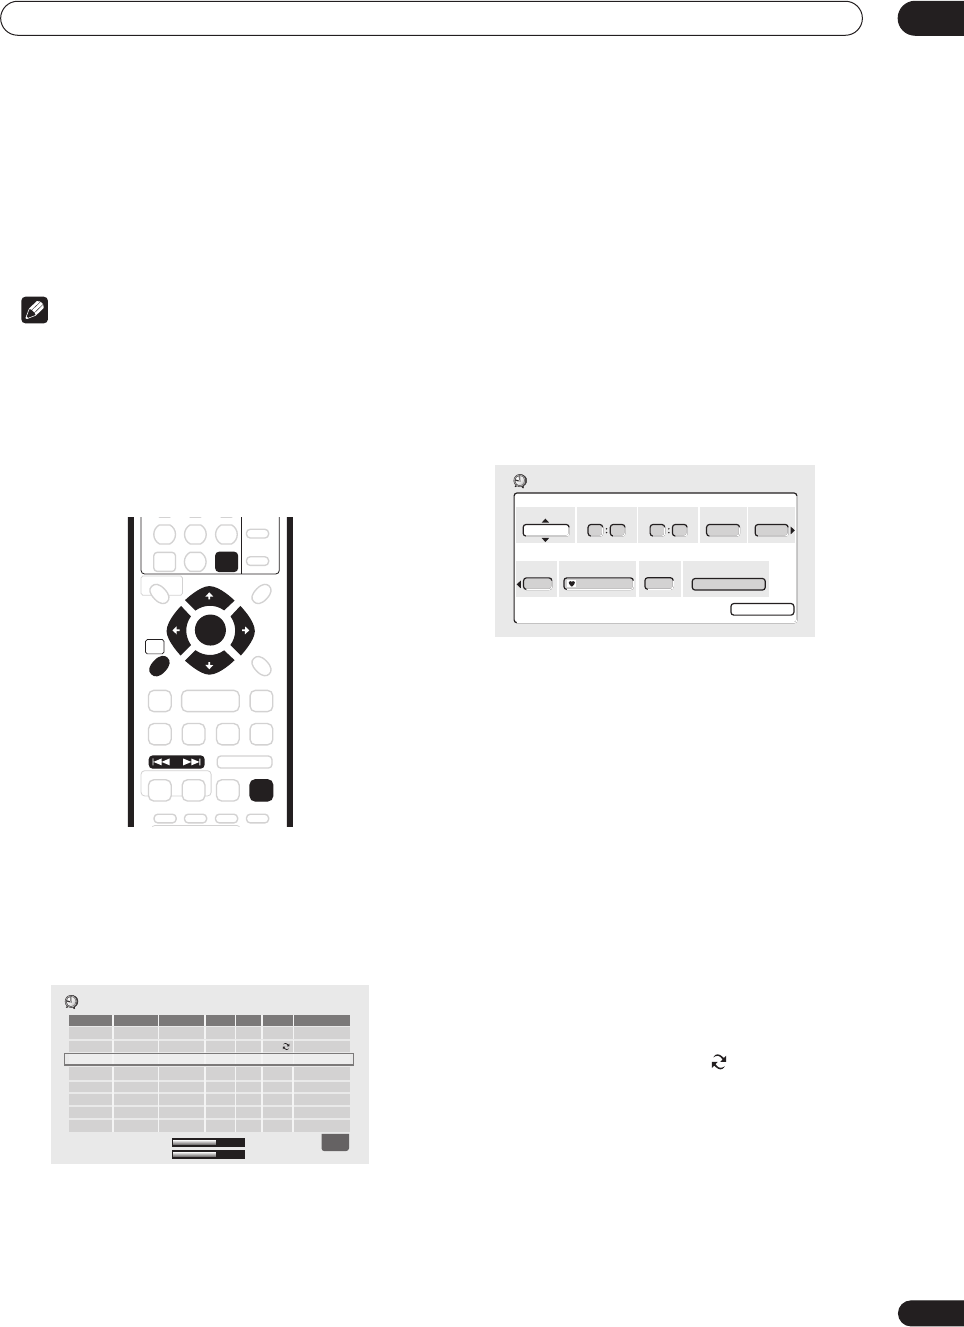
Standard timer recording
The timer recording screen you can see all the timer
programs already set, clear programs and set up new
ones.
1 Press TIMER REC to display the Timer Recording
screen.
You can also access the Timer Recording screen from
the Home Menu (press
HOME MENU
, select
Timer
Recording
, then
Timer Recording (View)
).
This screen shows all the timer programs currently set.
• Each row is for one timer recording program, with the
date and time information, channel, recording mode,
DVD or HDD and the VPS/PDC setting.
• The amount of free space available on the HDD and
the currently loaded recordable DVD is shown
towards the bottom of the screen.
• In the lower-right corner, the number of timer
programs already set and the number that use VPS/
PDC, is shown next to
Tmr Pgms
.
• If there are more than eight timer programs already
set, press
NEXT
to switch page (go back using
the
PREV
button).
• You can also clear a timer program before it’s started
(before the recorder enters timer recording standby)
by highlighting it and pressing
CLEAR
.
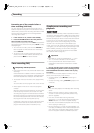
2 Select ‘New Input’ to set a new timer program,
then press ENTER.
3 Enter the timer recording settings.
Use the
/
(cursor left/right) buttons to select a field;
use the
/
(cursor up/down) buttons to change the
value.
•
Date
– Choose a date up to one month in advance, or
select a daily or weekly program.
•
Start
– Set the recording start time.
•
Stop
– Set the recording end time (maximum length
of a timer recording is 24 hours for HDD recording or
six hours for DVD).
•
CH
– Choose a channel (1–99, excluding skip
channels), or one of the external inputs from which to
record.
•
Mode
– Select
FINE
,
SP
,
LP
,
EP
or
AUTO
(See
Recording time and picture quality
on page 46). If
Manual Recording is on, then you can also select the
MN
setting.
•
Rec to
– Select
HDD
for hard disk recording or
DVD
for DVD recording. Select
HDD
for Auto Replace
Recording (daily or weekly timer recording only).
•
Group
– Select a record group (for HDD recording
only).
•
VPS/PDC
– The VPS/PDC system automatically
adjusts the recording time so that even if a program
is not running to schedule you won’t miss it. For VPS/
PDC to work properly, you must input the correct
announced time and date of the program you want to
record. Up to eight timer recordings can be set with
HOME
MENU
ENTER
CLEAR
PREV NEXT
TIMER REC
ì
MON
13/12
7:00 8:00 Pr 3 FINE
HDD
Off
EVERY
TUE
9
:00 10:00 Pr 5 FINE
HDD
On
New Input
Date Start Stop CH
Mode
Rec to VPS/PDC
1/1
Timer Recording
HDD Remain
10h20m(FINE)
DVD Remain
0h43m(FINE)
VPS/PDC
Date Start Stop CH
Rec Mode
12/12
SUN
10 00 -- -- Pr 7
SP
OFF
Timer Recording
Program Set
Ttl Name Input
Rec to Group
HDD
GROUP 1
DVR-04_HDD_UK.book 51 ページ 2004年4月11日 日曜日 午後6時11分