ADJUSTING AUDIO AND VIDEO SETTINGS
29
En
Setting the TV Screen Size
– DVD/Super VCD
The width-to-height ratio of conventional TVs is 4:3,
while the width-to-height ratio of wide screen and
high-definition TVs is 16:9. This width-to-height ratio is
called the aspect ratio.
When viewing software recorded in different aspect
ratios, the image’s height to width ratio can be switched
to match the TV or monitor being used.
Make changes to the TV screen size in the [TV Screen]
setting in the Setup screen Video 1 menu. Please note
that changes to the [TV Screen] setting cannot be made
when a disc is playing. Stop playback of the disc before
attempting to make any changes.
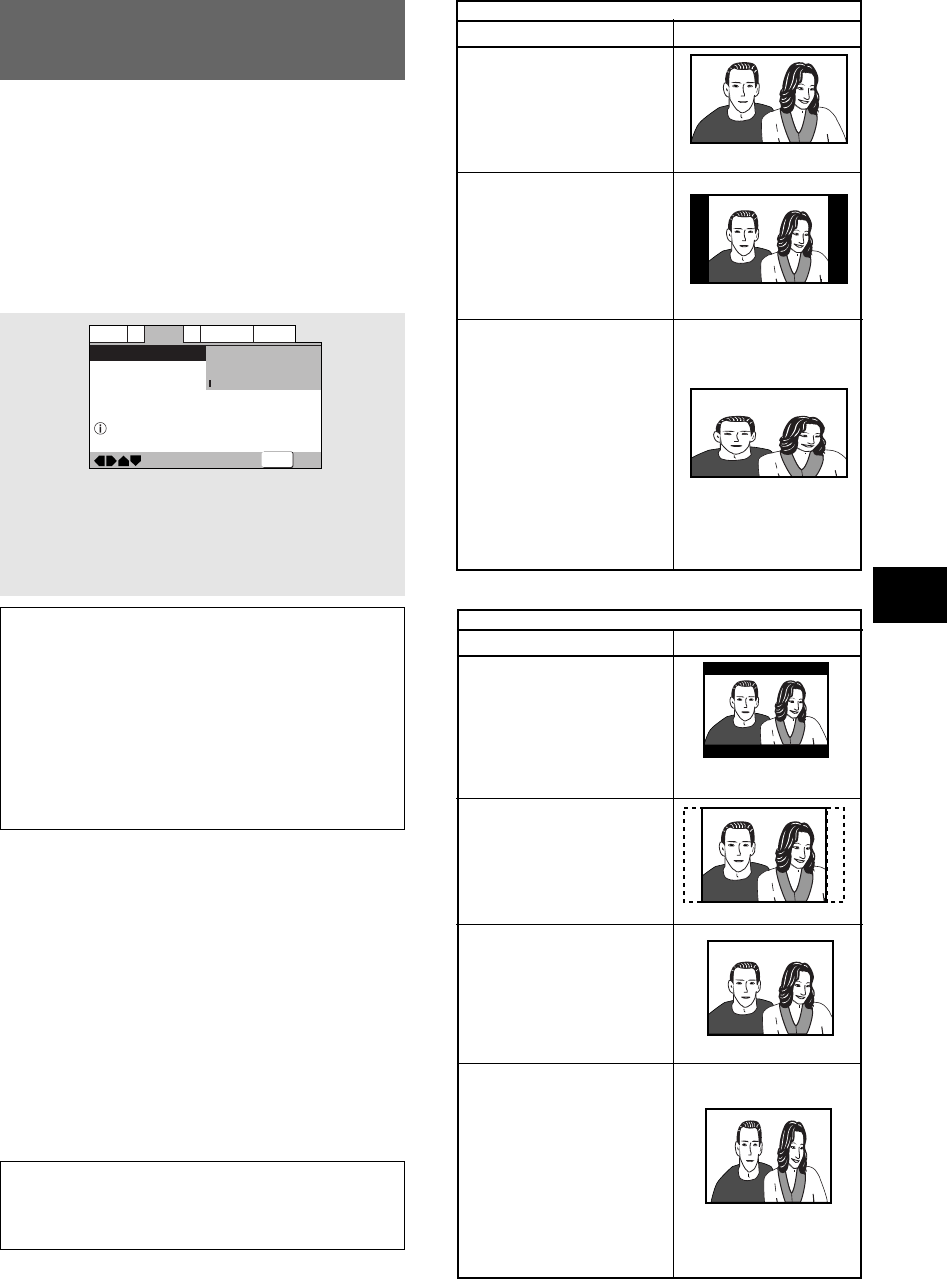
When viewing a wide screen TV or monitor
Standard screen format DVD/
Super VCD
When viewing a standard screen
format DVD/Super VCD on a
wide screen TV, black bars may
be automatically placed at the
side of the screen to adjust to
the DVD format.
“Wide” setting
Wide screen format DVD/
Super VCD
Please note that there are some
wide screen letter box formats
that place black bars at the top
and bottom of the screen. This is
not a malfunction.
“Wide” setting
“Wide” setting
Standard screen format DVD/
Super VCD (unnatural
stretched effect)
If you are viewing a standard
screen format DVD/Super VCD
on a wide screen TV, the picture
may appear ‘stretched’ on the
screen. To remedy this
condition, change your wide
screen TV to display a standard
(4:3) screen. Refer to the
instructions supplied with your
wide screen TV or monitor for
more information.
DVD/Super VCD screen size format
Setting and Appearance
Standard screen format DVD/
Super VCD
If you have a standard TV, the
standard screen format will be
presented regardless of the
setting.
When viewing a standard size TV or monitor
Wide screen format DVD/
Super VCD
The Pan & Scan presentation
crops both sides of the wide
screen presentation to use the
full standard TV screen.
“Letter Box” setting
Wide screen format DVD
The Letter box presentation
places black bars at the top and
bottom portions of the screen to
provide the full wide screen
presentation of a movie on a
standard TV (4:3 aspect ratio).
“Pan & Scan” setting
Any setting
Wide screen format DVD/
Super VCD (unnatural
squeezed effect)
If you are viewing a wide screen
format DVD/Super VCD on a
standard TV and the [TV
Screen] setting is set to [16:9
(Wide)], the picture may appear
‘squeezed’ on the screen. To
remedy this condition, select
either [4:3 (Letter Box)] or [4:3
(Pan & Scan)].
Setting and Appearance
“Wide” setting
Settings: 4:3 (Letter Box)
4:3 (Pan & Scan)
16:9 (Wide)*
*Factory setting
Notes
• If [Standard (4:3)] is selected in the Setup Navigator
screen, [4:3 (Letter Box)] is selected on this screen. If you
prefer the pan&scan format, change the settings on this
screen.
• Whether the aspect can be switched or not depends on the
disc. Please refer to the information written on the disc
jacket, etc.
• Some discs may not include the screen format selected in
the [TV Screen] setting. When this occurs, the standard TV
screen format available on the disc is automatically
selected.
Differences in screen sizes and DVD/Super
VCD formats
The number of screen size formats currently available
can be somewhat confusing. If set incorrectly, the video
presentation may not appear as it should. The following
diagrams and descriptions are intended to help you set
your TV screen size in a way that will allow you to fully
enjoy the digital video of DVD/Super VCD.
The settings in the [TV Screen] setting are perhaps
most applicable when the DVD/Super VCD you are
watching is programmed in the wide screen format. If
you have a standard TV, select either [4:3 (Letter Box)]
or [4:3 (Pan & Scan)] based on your personal
preference. If you have a wide screen TV, select [16:9
(Wide)].
Note
When playing Super VCDs, even if [4:3 (Letter Box)] is
selected in the [TV Screen] setting, the disc will be shown in
Pan & Scan format.
DVD/Super VCD screen size format
—
Audio1
Video1
Language
General
A2
V2
Exit
Move
TV Screen
4:3(Letter Box)
4:3(Pan&Scan)
16:9(Wide
)
Select your display preference
SETUP


