


The PhotoViewer (DVR-640H-AV)
11
116
En
• To get back to the folder list, press RETURN (or
when the leftmost thumbnail is highlighted).
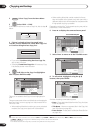
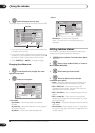
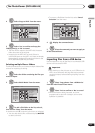
3 Select a thumbnail.
• Use the and buttons to display the previous/
next page of thumbnails.
4 Select ‘Start Slideshow’ from the menu.
• You can also select a file or folder then press PLAY
to start playing the slideshow.
• Use PREV / NEXT to display the previous/
next picture, or PAUSE to pause the slideshow.
• Depending on the aspect ratio, some pictures may be
displayed with black bars top and bottom, or left and
right.
• Large picture files may take a few seconds to display.
This is normal.
• During playback of the slideshow you can listen to
WMA/MP3 files in the Slideshow genre (see Editing
Jukebox albums on page 114)
5 Press to return to the thumbnail view area.
• You can also use the RETURN button.
6 Press to return to the folder view area.
• With the leftmost thumbnail highlighted, you can
use the button.
• To exit the Photo Viewer, press HOME MENU.
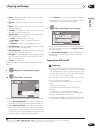
Reloading files from a disc or USB device
If you have a disc with more than 1000 files and/or 100
folders, you can still view all the images using the reload
function.
1 Navigate to the last entry in the folder list
(‘Read next: ...’).
2 Load the next batch of up to 999 files/99
folders from the disc or connected USB device.
It will take a moment (at most a few minutes) to load in
the images.
1
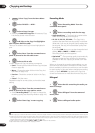
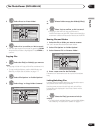
Zooming an image
During a slideshow you can zoom in to enlarge a portion
of the picture by a factor of two or four. You can also move
the area of the picture displayed.
1 Press during the slideshow to zoom the
picture.
Repeated presses cycle between zoom off,
2 x zoom and 4 x zoom. The zoom factor is displayed on-
screen.
2 Use to move the zoomed area.
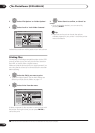
Rotating an image
You can rotate the displayed picture during a slideshow
so you can always view pictures the right way up,
whichever way they were taken.
• Press during the slideshow to rotate
the displayed picture clockwise by 90º.
Press repeatedly to continue rotating the picture in
increments of 90º.
Importing files to the HDD
You can import files and save them on to the HDD
2
from
a CD, DVD or a connected USB camera. Once on the
HDD you can edit and organize your pictures and print
them out if you’ve connected a PictBridge-compatible
printer.
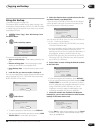
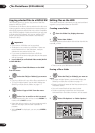
1 Select the location of folders/files you
want to import.
To import a whole folder, press ENTER here and skip to
step 4 below.
• To import multiple folders, use the Multi-Mode; see
Selecting multiple files or folders on page 117.
2 Select ‘File Selection’ from the menu.
3 Select a file to import, then press ENTER
..
..
• To import multiple folders, use the Multi-Mode; see
Selecting multiple files or folders
below.
Note
1 You can press
HOME MENU
to exit the Photo Viewer screen while the recorder is reloading images. (If you enter the Photo Viewer again, it
will resume reloading if from a CD or DVD.)
ENTER
ENTER
STOP
RETURN
ENTER
ENTER
2 For files you want to keep permanently, we recommend backing up to DVD-R/RW.
ENTER
ENTER
+
MAIN SUB
ANGLE
ENTER
ENTER